# Using the new CM4S module with eMMC on a CM3-panel-7-basic
This article explains how to use the new Raspberry CM4S module with eMMC memory
on-board on a CM3-Panel 7 basic terminal
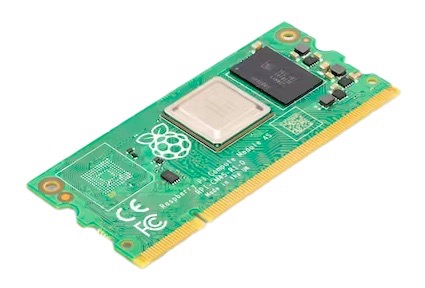
## The new CM4S module
"Based on the Raspberry Pi 4 Model B architecture, Compute Module 4S is intended for
specific industrial customers migrating from Compute Module 3 or Compute Module 3+ and is
not for general sale".
*
 A [Raspberry Compute IO Board](https://www.raspberrypi.com/products/compute-module-4s/)
is requested to transfer the OS on the eMMC memory of the CM4S module
## Step-by-step procedure description
Download one of Raspberry Pi OS images available on this page:
*
This articles has been tested with Raspberry Pi OS Desktop and Lite version 64 bit May 3rd 2023
Insert the [CM4S module](https://www.raspberrypi.com/products/compute-module-4s/)
on the [Raspberry Pi compute module IO board v3](https://www.raspberrypi.com/products/compute-module-io-board-v3/)
Place the J4 jumper on EN position the insert the USB SLAVE cable and then the POWER IN cable
Instal the
A [Raspberry Compute IO Board](https://www.raspberrypi.com/products/compute-module-4s/)
is requested to transfer the OS on the eMMC memory of the CM4S module
## Step-by-step procedure description
Download one of Raspberry Pi OS images available on this page:
*
This articles has been tested with Raspberry Pi OS Desktop and Lite version 64 bit May 3rd 2023
Insert the [CM4S module](https://www.raspberrypi.com/products/compute-module-4s/)
on the [Raspberry Pi compute module IO board v3](https://www.raspberrypi.com/products/compute-module-io-board-v3/)
Place the J4 jumper on EN position the insert the USB SLAVE cable and then the POWER IN cable
Instal the usbboot utility on your PC following this instruction:
*
The usb utility is used to boot the Raspberry Pi CM4S with a special firmware so that it emulates an USB Mass Storage.
	$ sudo ./rpiboot

	RPIBOOT: build-date Sep 27 2023 version 20221215~105525 c4b12f85
	Waiting for BCM2835/6/7/2711...
	Loading embedded: bootcode.bin
	Sending bootcode.bin
	Successful read 4 bytes
	Waiting for BCM2835/6/7/2711...
	Loading embedded: bootcode.bin
	Loading embedded: bootcode.bin
	Second stage boot server
	Cannot open file autoboot.txt
	Cannot open file config.txt
	Cannot open file recovery.elf
	Loading embedded: start.elf
	File read: start.elf
	Cannot open file fixup.dat
	Second stage boot server done
After that your eMMC will be visible as a normal microSD and you can save on it the Raspberry Pi OS image using
the [Raspberry Pi Imager](https://www.raspberrypi.com/software/) software.
Inside the first partition called __bootfs__ edit the cmdline.txt file changing:
console=serial0,115200
in
console=serial1,115200
Add these lines in config.txt file:
#Ignore the HDMI cable hotplug (to avoid the delay at startup)
hdmi_ignore_hotplug=1
# Set the debug port on GPIO32, GPIO33 pins
force_turbo=1
dtoverlay=uart1,txd1_pin=32,rxd1_pin=33
# Is not requested to insert this line
#enable_uart=1
# Activates the I2C 1 port on GPIO44 and 45 to talk with the
# touch screen controller end camera crypto-chip
# This line is deprecated
# dtoverlay=i2c1-bcm2708,sda1_pin=44,scl1_pin=45,pin_func=6
# Use this instead
dtoverlay=i2c1,pins_44_45
dtoverlay=goodix-7-acme
## Enable the DPI port to talk with the TFT display
dtoverlay=dpi18
overscan_left=0
overscan_right=0
overscan_top=0
overscan_bottom=0
framebuffer_width=800
framebuffer_height=480
enable_dpi_lcd=1
display_default_lcd=1
dpi_group=2
dpi_mode=87
dpi_output_format=0x6f005
hdmi_timings=800 0 40 48 88 480 0 13 3 32 0 0 0 60 0 32000000 6
and change
* dtparam=audio=on in #dtparam=audio=on
* dtoverlay=vc4-kms-v3d in dtoverlay=vc4-fkms-v3d
* max_framebuffers=2 in #max_framebuffers=2
Download this file:
* [dt-blob.bin](./dt-blob.bin)
and save it in on the bootfs partition
Download this file:
* [overlays/goodix-7-acme.dtbo](./goodix-7-acme.dtbo)
and save it in overlays directory.
### Enable the SSH server
By default the SSH server is disabled on the Rasperry pi OS standard microSD image. To enable it
create an empty file called __SSH__ with no extention on the first microSD partition.
The ssh server will be enabled at first startup and you can reach the Linux command prompt
via lan.
ssh pi@raspberrypi.local
Password: raspberry
Turn-off the Compute Module IO Board and remove the CM4S
Mount the CM4S module on a CM3-Panel 7 basic and turn it on
## Differences between CM3+ and CM4S
| | CM3+ | CM4 |
|-------|-----------------------|-----------------------|
| Chip | Broadcom BCM2837B0 | Broadcom BCM2711 |
| CPU | Cortex ARM 53 (ARMV8) | Cortex ARM 72 (ARMV8) |
| Clock | 1.2GHz | 1.5GHz |
| RAM | 1GB LPDDR2 | 1GB LPDDR4-3200 |
| Core | 4 | 4 |
| Bit | 64 | 64 |
| DIPS | 3136 | 7080 |
## Links
* CM4S
* [CM4S Product description](https://www.raspberrypi.com/products/compute-module-4s/)
* [CM4S Datasheet](https://datasheets.raspberrypi.com/cm4s/cm4s-datasheet.pdf)
* CM3+
* [CM3+ Product description](https://www.raspberrypi.com/products/compute-module-3-plus/)
* [CM3+ Datasheet](https://datasheets.raspberrypi.com/cm/cm3-plus-datasheet.pdf)
* [Compute module IO v3 schematic](https://datasheets.raspberrypi.com/cmio/cmio-schematics.pdf)
* [usbboot](https://github.com/raspberrypi/usbboot/blob/master/Readme.md#building)
## Device tree sources
### goodix-7-acme.dts
* [goodix-7-acme.dts](./goodix-7-acme.dts)
To compile it you need a Linux PC or a Raspberry Pi and a Device Tree Compiler:
sudo dtc -@ -I dts -O dtb -o /boot/overlays/goodix-7-acme.dtbo /boot/overlays/goodix-7-acme.dts
### dt-blob.dts
* [dt-blob.dts](./dt-blob.dts)
To compile it you need a Linux PC or a Raspberry Pi and a Device Tree Compiler:
sudo dtc -I dts -O dtb -o /boot/dt-blob.bin /boot/dt-blob.dts
@include='bio_tanzilli'