# Getting started with Berta H10
This article illustrates step-by-step how to getting started with Berta-H10 fast prototyping systems
Hardware requested:
* [Berta-H10 board](/h10_berta)
* ISM antenna
* [Acme Sensor board](/acmesensor)
* [SWD In-circuit programmer](/h10_swd_brizio)
* Debian Linux PC
Software requested:
* A Debian or Ubuntu Linux distribution
* An ASCII editor
## Charge the hybrid supercap
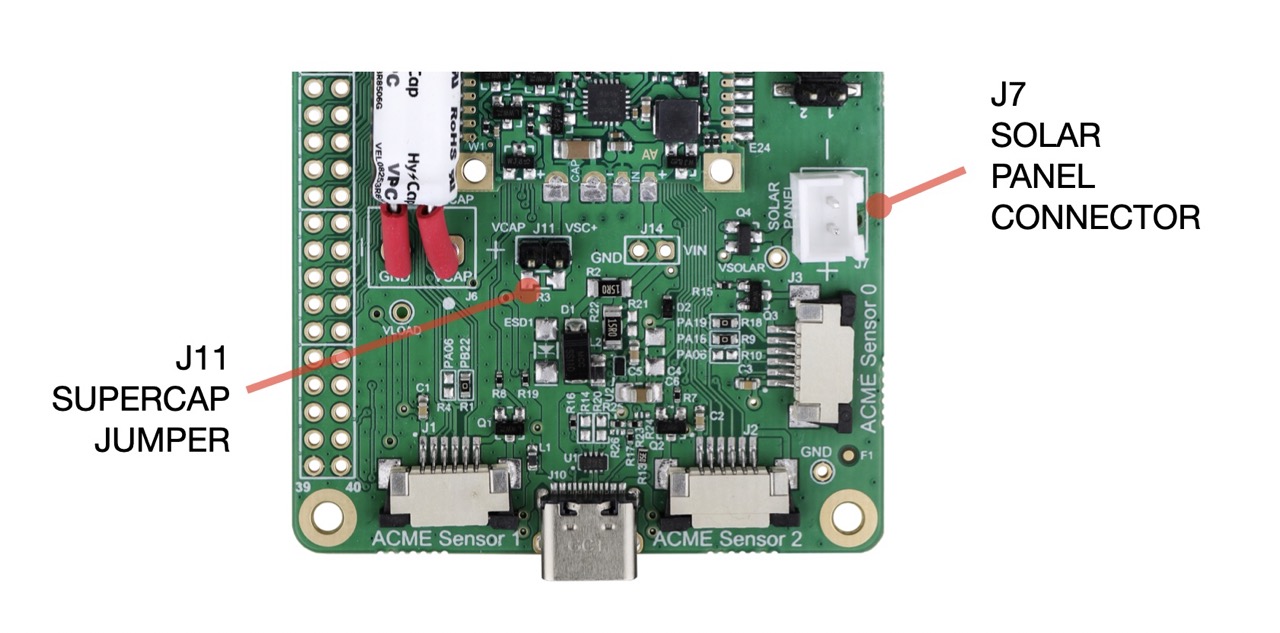
On Berta-H10 board is mounted a 50 Farad Hybrid Supercap. The J11 jumper detach this capacitor
to the circuitry to avoid discharging it during shipping or storage.
Probably this capacitor was already charged when you received the board but could be a good thing to charge it
before starting with the in-circuit programming.
Plug the solar panel to the J7 connector the short close the J11 supercap jumper and put the board inside a light source.
 ## Install the H10 Software Development Kit on your Linux PC
The software environment of Berta-H10 is based on C language and [RIOT Operative Systems](https://www.riot-os.org/). All the software you need is Open Source and available for free from Internet.
In this article we'll explain how to install it on a Ubuntu 22 Linux PC but probably it can be used on other distributions.
Install some packages needed for compilation:
sudo apt update
sudo apt -y install build-essential gcc-arm-none-eabi libudev-dev python3-serial python3-twisted git
Create a base folder:
mkdir lora3a-projects
cd lora3a-projects
Download the [RIOT]((https://www.riot-os.org/)) sources from the official repository:
git clone --depth 1 https://github.com/RIOT-OS/RIOT
Download the Acme Systems H10 specific sources:
Basic sensors handling example code :
git clone --depth 1 https://github.com/lora3a/lora3a-boards
LoRa based sensors example code :
git clone --depth 1 https://github.com/lora3a/demo_acme_dev
Remove the J11 jumper to isolate the Supercap and plug an USB C cable between the USB C port of Berta H10 and a power supply or a USB of your PC
Connect the In-circuit programmer as explained in this article:
* @article='h10_swd_brizio'
Compile an start a code example typing:
cd lora3a-boards/examples/sensor-node
make flash PORT=/dev/ttyACM0 term reset
The example of code will be compiled, programmed on the Berta H10 and the debug message displayed on your PC
## Install the H10 Software Development Kit on your Linux PC
The software environment of Berta-H10 is based on C language and [RIOT Operative Systems](https://www.riot-os.org/). All the software you need is Open Source and available for free from Internet.
In this article we'll explain how to install it on a Ubuntu 22 Linux PC but probably it can be used on other distributions.
Install some packages needed for compilation:
sudo apt update
sudo apt -y install build-essential gcc-arm-none-eabi libudev-dev python3-serial python3-twisted git
Create a base folder:
mkdir lora3a-projects
cd lora3a-projects
Download the [RIOT]((https://www.riot-os.org/)) sources from the official repository:
git clone --depth 1 https://github.com/RIOT-OS/RIOT
Download the Acme Systems H10 specific sources:
Basic sensors handling example code :
git clone --depth 1 https://github.com/lora3a/lora3a-boards
LoRa based sensors example code :
git clone --depth 1 https://github.com/lora3a/demo_acme_dev
Remove the J11 jumper to isolate the Supercap and plug an USB C cable between the USB C port of Berta H10 and a power supply or a USB of your PC
Connect the In-circuit programmer as explained in this article:
* @article='h10_swd_brizio'
Compile an start a code example typing:
cd lora3a-boards/examples/sensor-node
make flash PORT=/dev/ttyACM0 term reset
The example of code will be compiled, programmed on the Berta H10 and the debug message displayed on your PC
Related products
@include='card_bertah10'
@include='card_h10'