#Atmel SAML21 ASF compiling and FLASH programming on Linux
This article illustrates how to install the GNU Toolchain for SAML21, install the ASF libraries, compile a default example and write on the SAML21 FLASH under Linux
Tested with Ubuntu Linux 16.04.02
## Install the gnu-arm-none-eabi toolchain
sudo apt-get install gnu-arm-none-eabi
## Install the Microchip ASF library
Download the __Microchip Advanced Software Framework__ from the following link to your home directory:
* [Microchip Advanced Software Framework v3.39](http://www.microchip.com/avr-support/advanced-software-framework-(asf))
and uncopress it:
unzip xdk-asf-3.39.0.zip
## Compile a blinking led example
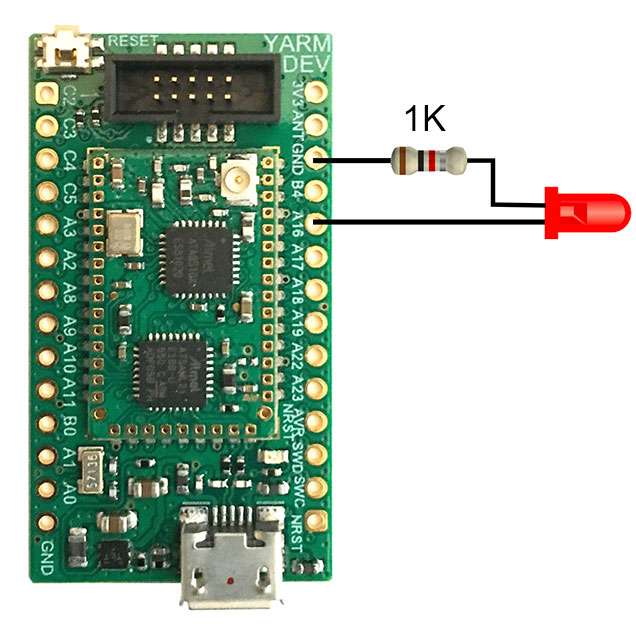
Wire a led to the Yadm SDK as shown below:
 Move inside the led-toggle default example:
cd xdk-asf-3.39.0/sam0/applications/led_toggle
Edit the file led_toggle.c and change all the LED_0_PIN strings with string PIN_PA16:
Move inside the make directory:
cd saml21_xplained_pro_b/gcc
the type:
make
The result will be something like this:
MKDIR common/utils/interrupt/
CC common/utils/interrupt/interrupt_sam_nvic.o
MKDIR sam0/applications/led_toggle/
CC sam0/applications/led_toggle/led_toggle.o
MKDIR sam0/boards/saml21_xplained_pro_b/
CC sam0/boards/saml21_xplained_pro_b/board_init.o
MKDIR sam0/drivers/port/
CC sam0/drivers/port/port.o
MKDIR sam0/drivers/system/clock/clock_saml21/
CC sam0/drivers/system/clock/clock_saml21/clock.o
CC sam0/drivers/system/clock/clock_saml21/gclk.o
MKDIR sam0/drivers/system/interrupt/
CC sam0/drivers/system/interrupt/system_interrupt.o
MKDIR sam0/drivers/system/pinmux/
CC sam0/drivers/system/pinmux/pinmux.o
CC sam0/drivers/system/system.o
MKDIR sam0/utils/cmsis/saml21/source/gcc/
CC sam0/utils/cmsis/saml21/source/gcc/startup_saml21.o
CC sam0/utils/cmsis/saml21/source/system_saml21.o
MKDIR sam0/utils/syscalls/gcc/
CC sam0/utils/syscalls/gcc/syscalls.o
LN led_toggle_flash.elf
SIZE led_toggle_flash.elf
led_toggle_flash.elf :
section size addr
.text 0x85c 0x0
.relocate 0x4 0x20000000
.lpram 0x0 0x30000000
.bss 0x3c 0x20000004
.stack 0x2000 0x20000040
.ARM.attributes 0x28 0x0
.comment 0x59 0x0
.debug_info 0xd501 0x0
.debug_abbrev 0x1a70 0x0
.debug_aranges 0x228 0x0
.debug_ranges 0x1b0 0x0
.debug_macro 0x1a4a0 0x0
.debug_line 0x5a6d 0x0
.debug_str 0x98505 0x0
.debug_frame 0x4d4 0x0
.debug_loc 0x17f0 0x0
Total 0xcbd3c
text data bss dec hex filename
0x85c 0x4 0x203c 10396 289c led_toggle_flash.elf
OBJDUMP led_toggle_flash.lss
NM led_toggle_flash.sym
OBJCOPY led_toggle_flash.hex
OBJCOPY led_toggle_flash.bin
The file led_toggle_flash.bin is the binary file to save inside the Yarm CPU using the edbg programmer as described below.
## Install the Microchip EDBG programmer
We will use the Atmel-ICE to transfer our code on the Yarm module.
Clone in your home directory the EDBG programmer git repository by typing:
git clone https://github.com/ataradov/edbg.git
cd edbg
sudo cp 90-atmel-edbg.rules /etc/udev/rules.d/
sudo udevadm control --reload
Install the __libudev__ library
sudo apt-get install libudev-dev
launch make:
make
## Using the Microchip EDBG programmer
Write the led_toggle example by typing:
cp ../xdk-asf-3.39.0/sam0/applications/led_toggle/saml21_xplained_pro_b/gcc/led_toggle_flash.bin .
./edbg -b -p -v -f led_toggle_flash.bin -t atmel_cm0p
## Credits
Many thanks to Antonio Galea his contribute to this article
@include='bio_tanzilli'
Move inside the led-toggle default example:
cd xdk-asf-3.39.0/sam0/applications/led_toggle
Edit the file led_toggle.c and change all the LED_0_PIN strings with string PIN_PA16:
Move inside the make directory:
cd saml21_xplained_pro_b/gcc
the type:
make
The result will be something like this:
MKDIR common/utils/interrupt/
CC common/utils/interrupt/interrupt_sam_nvic.o
MKDIR sam0/applications/led_toggle/
CC sam0/applications/led_toggle/led_toggle.o
MKDIR sam0/boards/saml21_xplained_pro_b/
CC sam0/boards/saml21_xplained_pro_b/board_init.o
MKDIR sam0/drivers/port/
CC sam0/drivers/port/port.o
MKDIR sam0/drivers/system/clock/clock_saml21/
CC sam0/drivers/system/clock/clock_saml21/clock.o
CC sam0/drivers/system/clock/clock_saml21/gclk.o
MKDIR sam0/drivers/system/interrupt/
CC sam0/drivers/system/interrupt/system_interrupt.o
MKDIR sam0/drivers/system/pinmux/
CC sam0/drivers/system/pinmux/pinmux.o
CC sam0/drivers/system/system.o
MKDIR sam0/utils/cmsis/saml21/source/gcc/
CC sam0/utils/cmsis/saml21/source/gcc/startup_saml21.o
CC sam0/utils/cmsis/saml21/source/system_saml21.o
MKDIR sam0/utils/syscalls/gcc/
CC sam0/utils/syscalls/gcc/syscalls.o
LN led_toggle_flash.elf
SIZE led_toggle_flash.elf
led_toggle_flash.elf :
section size addr
.text 0x85c 0x0
.relocate 0x4 0x20000000
.lpram 0x0 0x30000000
.bss 0x3c 0x20000004
.stack 0x2000 0x20000040
.ARM.attributes 0x28 0x0
.comment 0x59 0x0
.debug_info 0xd501 0x0
.debug_abbrev 0x1a70 0x0
.debug_aranges 0x228 0x0
.debug_ranges 0x1b0 0x0
.debug_macro 0x1a4a0 0x0
.debug_line 0x5a6d 0x0
.debug_str 0x98505 0x0
.debug_frame 0x4d4 0x0
.debug_loc 0x17f0 0x0
Total 0xcbd3c
text data bss dec hex filename
0x85c 0x4 0x203c 10396 289c led_toggle_flash.elf
OBJDUMP led_toggle_flash.lss
NM led_toggle_flash.sym
OBJCOPY led_toggle_flash.hex
OBJCOPY led_toggle_flash.bin
The file led_toggle_flash.bin is the binary file to save inside the Yarm CPU using the edbg programmer as described below.
## Install the Microchip EDBG programmer
We will use the Atmel-ICE to transfer our code on the Yarm module.
Clone in your home directory the EDBG programmer git repository by typing:
git clone https://github.com/ataradov/edbg.git
cd edbg
sudo cp 90-atmel-edbg.rules /etc/udev/rules.d/
sudo udevadm control --reload
Install the __libudev__ library
sudo apt-get install libudev-dev
launch make:
make
## Using the Microchip EDBG programmer
Write the led_toggle example by typing:
cp ../xdk-asf-3.39.0/sam0/applications/led_toggle/saml21_xplained_pro_b/gcc/led_toggle_flash.bin .
./edbg -b -p -v -f led_toggle_flash.bin -t atmel_cm0p
## Credits
Many thanks to Antonio Galea his contribute to this article
@include='bio_tanzilli'