#Getting Started with RIOT and YARM
<abstract>
RIOT is a real-time multi-threading operating system that supports a range of devices that are typically found in the Internet of Things (IoT): 8-bit, 16-bit and 32-bit microcontrollers
</abstract>
</br>
<img src="./riot-yarm.jpg" class="img-responsive center-block">

</br>
This short tutorial shows the necessary steps to install all the tools used to develop applications based on <a href="https://www.riot-os.org/" target="_blank">RIOT</a>, running on Yarm devices. 
</br>
<p><strong>Please note : This procedure has been tested on a PC running Virtual Box VM, Host Win10 Pro 64, Guest Ubuntu 22.04 64.</strong></p>


##Preparing your system for RIOT
First we download all the necessary tools

###Development / Compile Tools
System compiler, linker, make etc.

<div class="terminal">
	sudo apt install build-essential
</div>

###Toolchain
Arm cross-compiler for Yarm  SAM L21E18B MCU.

<div class="terminal">
	sudo apt-get install gcc-arm-none-eabi
</div>

###Git
Git version control tool.

<div class="terminal">
	sudo apt install git
</div>

###Edbg
Command line utility for programming ARM-based MCUs through CMSIS-DAP SWD interface on Atmel-ICE.

<div class="terminal">
	cd ~
	git clone https://github.com/ataradov/edbg.git
	cd edbg/
	sudo cp 90-atmel-edbg.rules /etc/udev/rules.d/
	sudo udevadm control --reload
	sudo apt-get install libudev-dev
	make
</div>

###Install pip
Pip is the package installer for Python

<div class="terminal">
	sudo apt install python-pip
</div>


##Install RIOT (Antonio Galea branch for yarm radio)
Thanks to Antonio, it is possible to use the ATA8510 chip of the Yarm on RIOT.

###Download RIOT from Git
Main branch.

<div class="terminal">
	cd~
	git clone https://github.com/ant9000/RIOT.git
</div>

Branch to yarm radio by Antonio Galea.

<div class="terminal">
	cd RIOT
	git checkout yarm_radio
</div>

###Cross platform utilities
If developing on a 64 bit platform, install these to run 32 bit apps.

<div class="terminal">
	sudo apt-get install gcc-multilib
	sudo apt-get install g++-multilib
</div>


###Install python module pySerial
This module is used by pyterm, a python based serial terminal, included in the RIOT repository

<div class="terminal">
	pip install pyserial
</div>

###Install python module twisted
"twisted is an event-based framework for internet applications, supporting Python 3.6+."

<div class="terminal">
	pip install twisted
</div>


##First RIOT test application
Once the installation is completed, let's check that everything was properly done by running the following test.

###Setup programming connections
First of all we must prepare the right setup to program the YARM.

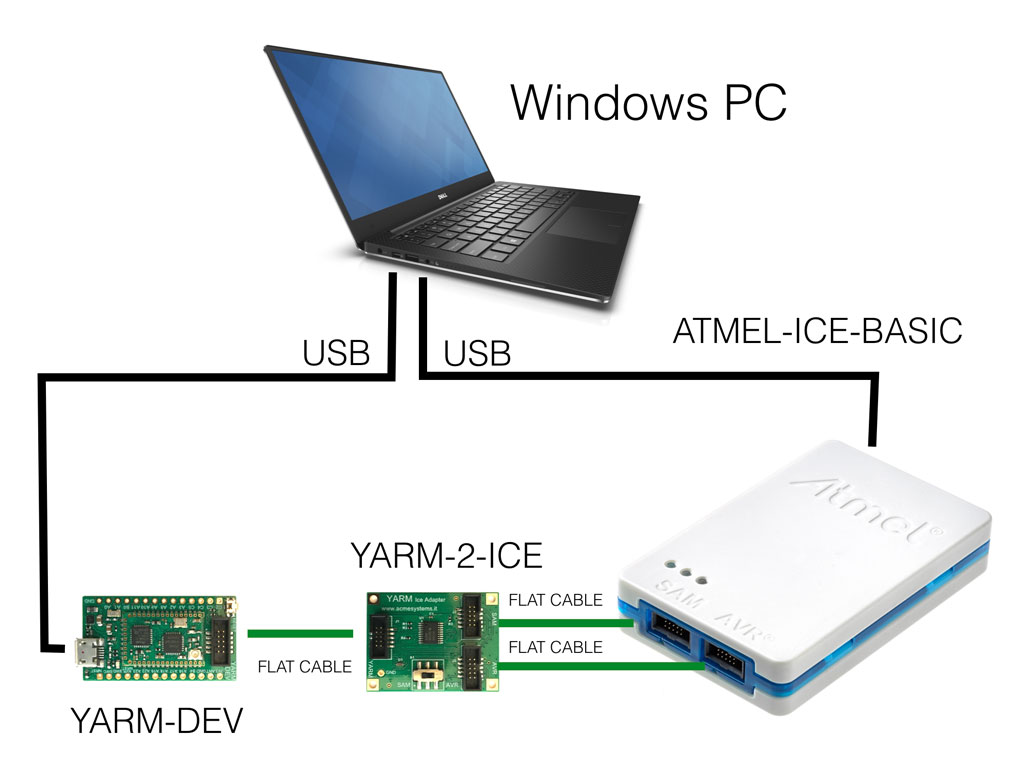
Connections to PC, Atmel-ICE, YARM-2_ICE and YARM DEV are shown in the following picture

<img src="./yarm-dev-setup.jpg" class="img-responsive center-block">

<p><strong>Make sure the switch on the YARM-2-ICE is set to SAM</strong></p>

###Create a workspace folder

<div class="terminal">
	cd~
	mkdir workspace
</div>
 
###In workspace create a first test folder

<div class="terminal">
	cd workspace
	mkdir riot_first
	cd riot_first
</div>

###Create and save this Makefile
	APPLICATION = Task01
	BOARD = yarm
	RIOTBASE = /home/$(USER)/RIOT
	CFLAGS += -DDEVELHELP
	QUIET ?= 1
	USEMODULE += shell
	USEMODULE += shell_commands
	USEMODULE += ps
	include $(RIOTBASE)/Makefile.include
	
###Create and save this main.c file

	#include <stdio.h>
	#include <string.h>
	#include "shell.h"

	int main(void)
	
	{
	int j;
	int i=0;

	    for(j=0;j<25500000;j++);
	    printf("This is Task-01");
	    while(1)
	    {
	    	for(j=0;j<5500000;j++);
	    	printf("Running  %8x - %2x\n",i, i%0x10);
	    	i++;
	    }
	    return 0;
	}
	
### Compile, flash

The following command will compile and link the source code, flash the MCU, then execute the terminal emulator

<div class="terminal">
	make all flash term 
</div>
</br>

A successful compile and link procedure looks like this :
<div class="terminal">
	Building application "Task01" for "yarm" with MCU "saml21".
	"make" -C /home/user/RIOT/boards/yarm
	"make" -C /home/user/RIOT/core
	"make" -C /home/user/RIOT/cpu/saml21
	"make" -C /home/user/RIOT/drivers
	"make" -C /home/user/RIOT/sys
	"make" -C /home/user/RIOT/drivers/periph_common
	"make" -C /home/user/RIOT/sys/auto_init
	"make" -C /home/user/RIOT/sys/event
	"make" -C /home/user/RIOT/sys/isrpipe
	"make" -C /home/user/RIOT/cpu/cortexm_common
	"make" -C /home/user/RIOT/sys/newlib_syscalls_default
	"make" -C /home/user/RIOT/sys/auto_init/usb
	"make" -C /home/user/RIOT/cpu/sam0_common
	"make" -C /home/user/RIOT/sys/pm_layered
	"make" -C /home/user/RIOT/cpu/saml21/periph
	"make" -C /home/user/RIOT/sys/ps
	"make" -C /home/user/RIOT/sys/shell
	"make" -C /home/user/RIOT/sys/shell/commands
	"make" -C /home/user/RIOT/sys/tsrb
	"make" -C /home/user/RIOT/sys/usb/usbus
	"make" -C /home/user/RIOT/cpu/sam0_common/periph
	"make" -C /home/user/RIOT/cpu/cortexm_common/periph
	"make" -C /home/user/RIOT/sys/usb/usbus/cdc/acm
	   text	   data	    bss	    dec	    hex	filename
	  23432	    136	   5856	  29424	   72f0	/home/user/workspace/riot_first/bin/yarm/Task01.elf
</div>

</br>
Then the MCU is flashed
<div class="terminal">
	/home/user/RIOT/dist/tools/edbg/edbg  --target saml21 --verbose --file /home/user/workspace/riot_first/bin/yarm/Task01.bin --verify || /home/user/RIOT/dist/tools/edbg/edbg  --target saml21 --verbose --file /home/user/workspace/riot_first/bin/yarm/Task01.bin --verify --program
	Debugger: ATMEL Atmel-ICE CMSIS-DAP J41800017751 01.24.007E (SJ)
	Clock frequency: 16.0 MHz
	Target: SAM L21E18B (Rev C)
	Verification.......
	at address 0x4e0 expected 0x88, read 0x84
	Error: verification failed
	Debugger: ATMEL Atmel-ICE CMSIS-DAP J41800017751 01.24.007E (SJ)
	Clock frequency: 16.0 MHz
	Target: SAM L21E18B (Rev C)
	Programming................................................................................................ done.
	Verification................................................................................................ done.
</div>

</br>
Entering terminal and monitoring program execution
<div class="terminal">
	sleep 2
	/home/user/RIOT/dist/tools/pyterm/pyterm -p "/dev/ttyACM0" -b "115200"  
	2023-06-01 16:07:58,007 # Connect to serial port /dev/ttyACM0
	Welcome to pyterm!
	Type '/exit' to exit.

	2023-06-01 16:07:59,036 # Running         4 -  4
	2023-06-01 16:07:59,036 # Running         5 -  5
	2023-06-01 16:07:59,112 # Running         6 -  6
	2023-06-01 16:07:59,576 # Running         7 -  7
	2023-06-01 16:08:00,040 # Running         8 -  8
	2023-06-01 16:08:00,503 # Running         9 -  9
	2023-06-01 16:08:00,967 # Running         a -  a
	2023-06-01 16:08:01,431 # Running         b -  b
	2023-06-01 16:08:01,894 # Running         c -  c
	2023-06-01 16:08:02,358 # Running         d -  d
	2023-06-01 16:08:02,822 # Running         e -  e
	2023-06-01 16:08:03,285 # Running         f -  f
	2023-06-01 16:08:03,748 # Running        10 -  0
	2023-06-01 16:08:04,212 # Running        11 -  1
	/exit
	2023-06-01 16:08:04,337 # Exiting Pyterm
</div>
</br>

## Notes

Some additional tools could be installed to facilitate code development / debug

<img src="./gtkterm_256x256.png" width="48px" class="img-circle"> <a href="https://www.acmesystems.it/gtkterm" target="_blank">Gtkterm</a>	Gnome serial terminal, useful when using the onboard Yarm usb connector as a monitor / debug port.

<img src="./geany.jpg" width="48px" class="img-circle">	<a href="https://www.geany.org/Geany" target="_blank">Geany</a> is a lightweight programmer's text editor.

<img src="./meld.jpg" width="48px" class="img-circle">	<a href="https://meld.app/#" target="_blank">Meld</a> helps you compare files, directories, and version controlled projects..

## Reference

* @article='yarm' Main Page
* <a href="https://www.riot-os.org/" target="_blank">RIOT</a> Main Page
* <a href="https://doc.riot-os.org/" target="_blank">RIOT Documentation</a>

@include='adv_yarm'

@include='bio_rinalduzzi'

<br/>
