#Yarm and alphanumeric LCD 16x2
This article illustrates an example on how to use the I2C master bus on Yarm. We'll interface
a Daisy-24 module based on a Winstar I2C LCD and an I2C GPIO expander.
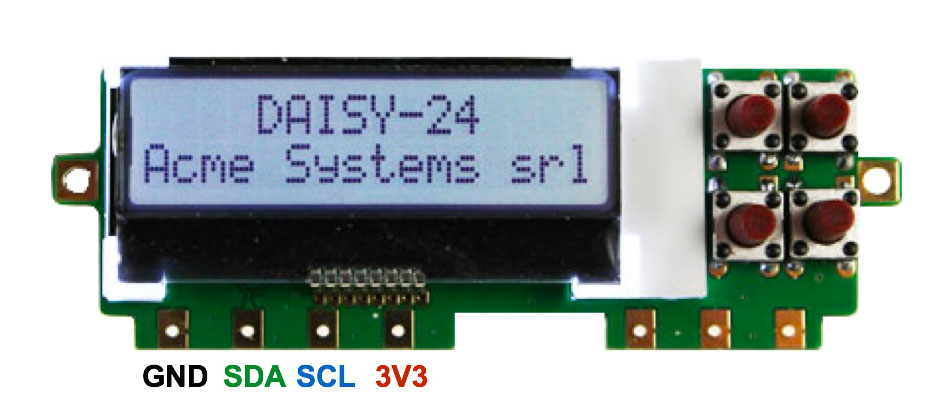 The Winstar LCD is compatible with the classic Hitachi HD44780 protocol but over an I2C bus instead of a parallel port
and its I2C address is 0x3E.
* [Winstar WO1602I-TFH-AT# datasheet](http://terzo.acmesystems.it/download/datasheets/LCD-1.pdf)
The four push buttons and the LCD backlight are managed through a PCF8574T I2C GPIO expander
* [Philips PCF8574 datasheet](http://terzo.acmesystems.it/download/datasheets/PCF8574.pdf)
The I/O expander I2C address depends on which chip is mounted on the board
as listed below:
* PCF8574AT = 0x3F
* PCF8574T = 0x27
In case you don't need push buttons it is possible to use just the Winstar LCD.
##Wirings
This is the list of wirings to link the DAISY-24 display to the YARM-DEV board:
| Yarm-dev pin # | SAM line | Signal | Daisy-24 |
|----------------|-------------------|----------|----------|
| 14 | GND | GND | GND |
| 7 | PA8 (data line) | I2C-SDA | SDA |
| 8 | PA9 (clock line ) | I2C-SCL | SCL |
| 28 | 3V3 | 3V3 | 3V3 |
## Code examples
In these examples we will use the [Cledic's Yarm libraries available on GitHub](https://github.com/cledic/YARM)
To install them in your Atmel Studio environment add
* Daisy24_lib.c
* Daisy24_lib.h
in the src folder of your project
Add also this [minimal set of ASF library](/yarm_asf_minimal_set)
### Hello World !
@source='hello.c'
### Set cursor position
@source='cursor.c'
### Backlight
@source='backlight.c'
If the backlight remains ON, change these lines in Daisy24_lib.c
source.
The Winstar LCD is compatible with the classic Hitachi HD44780 protocol but over an I2C bus instead of a parallel port
and its I2C address is 0x3E.
* [Winstar WO1602I-TFH-AT# datasheet](http://terzo.acmesystems.it/download/datasheets/LCD-1.pdf)
The four push buttons and the LCD backlight are managed through a PCF8574T I2C GPIO expander
* [Philips PCF8574 datasheet](http://terzo.acmesystems.it/download/datasheets/PCF8574.pdf)
The I/O expander I2C address depends on which chip is mounted on the board
as listed below:
* PCF8574AT = 0x3F
* PCF8574T = 0x27
In case you don't need push buttons it is possible to use just the Winstar LCD.
##Wirings
This is the list of wirings to link the DAISY-24 display to the YARM-DEV board:
| Yarm-dev pin # | SAM line | Signal | Daisy-24 |
|----------------|-------------------|----------|----------|
| 14 | GND | GND | GND |
| 7 | PA8 (data line) | I2C-SDA | SDA |
| 8 | PA9 (clock line ) | I2C-SCL | SCL |
| 28 | 3V3 | 3V3 | 3V3 |
## Code examples
In these examples we will use the [Cledic's Yarm libraries available on GitHub](https://github.com/cledic/YARM)
To install them in your Atmel Studio environment add
* Daisy24_lib.c
* Daisy24_lib.h
in the src folder of your project
Add also this [minimal set of ASF library](/yarm_asf_minimal_set)
### Hello World !
@source='hello.c'
### Set cursor position
@source='cursor.c'
### Backlight
@source='backlight.c'
If the backlight remains ON, change these lines in Daisy24_lib.c
source.
//#define EXPANDER_I2C_ADDR       0x27    // PCF8574T
#define EXPANDER_I2C_ADDR	    0x3F	// PCF8574AT
or viceversa
#define EXPANDER_I2C_ADDR       0x27    // PCF8574T
//#define EXPANDER_I2C_ADDR	    0x3F	// PCF8574AT
The right address depends from the I2C expander chip mounted on your Daisy24 module.
### Read push-buttons
@source='readbuttons.c'
If nothing happen pressing the buttons, read how to change the I2C expander address
in the backlight example.
## Links
* [Cledic's Daisy-24 libraries for Yarm](https://github.com/cledic/YARM/blob/master/main_daisy24.c)
* [DAISY-24 schematic](http://terzo.acmesystems.it/download/schematics/schematic_daisy24.pdf)
* [DAISY-24 product description](/DAISY-24)
## Buy
@shop='DAISY-24'
@shop='YARM-DEV'
@shop='LCD-1'