# How to reflash a FOX Board

<abstract>
This article describes how to reprogram the FLASH memory of the FOX board
</abstract>

## General concepts

The FOX board has a FLASH memory where you can store all the program files needed for its correct working.
On this permanent memory are stored the Linux operative system and all the applications and data that the FOX needs 
as like as an Hard Disk drive on a PC.

To create an fimage from the sources it is necessary to use the FOX Board Software Development Kit (SDK). Some ready to use 
precompiled fimages (<b>flash images</b>) are also available from the @h1='704' or inside the
single articles available on this site.

Each FOX Boards is delivered with ready to run Linux image. This image can changes in relation 
to the availability of new software updates, appliances, board models and memory sizes. 

If you need to change the default image to use a new one generated by yourself with SDK 
or available from third party you can select one of the methods listed below.

It is important to clarify that you don't need to recompile a new image 
to be able to distribute the FOX Board with your custom application. It is sufficient instead, 
on the majority of cases, to transfer simply your application through <a href="/?id=56">FTP</a> or 
SSH directly into the FOX Board file system in a rewritable area of the FLASH memory (i.e. /mnt/flash).

An important point to know is that in any case <b>YOU WILL ALWAYS BE ABLE TO RECOVER A FOX BOARD</b> 
from a wrong flashing even if you  flash the FOX Board with a non working fimage.

If you happen to flash a Fox Board wrongly, just download one of our published 
fimages (@h1='704') matching your board (@h1='833') memory size and reflash 
the FOX Board with one of the procedures here explained with exclusion of 
the FTP or WEB ones since those needs cooperation from the FOX Board itself to take place.

##Reflashing methods

###Local network flashing

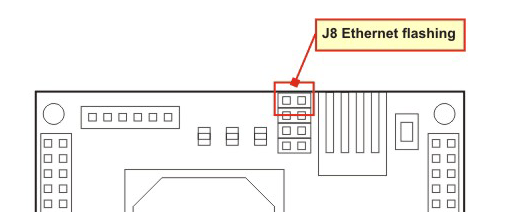
This mechanism rely on a small ROM code inside the AXIS processor that starts up when
the J8 jumper is closed on power up. This code loads in the internal cache memory the LAN packet broadcasted 
from the PC that is running the flashing process. The Axis will execute 
that small piece of code inside the LAN packet and will start to interact 
with the workstation PC to download the programming procedure chosen for the FLASH memory onboard. 

<img src="./j8.png"/>

This method works only on a Local Area Network and not support any IP routing.

<ul>
<li><a href="/703#117">Network flashing with Linux</a></li>
<li><a href="/703#126">Network flashing with Windows XP</a></li>
<li><a href="/703#125">Network flashing with another FOX Board</a></li>
</ul>

###Remote network flashing

This method is based on FTP or HTTP internet protocol and can work remotely over a TCP/IP lan. The fimage 
is uploaded on the FOX Board flash memory and then transfered to memory flash by a Linux application. It doesn't 
work if Linux is not already working on the board.

This method can be used to fully update remote FOX Board but if the image is incorrect there isn't any way to 
restore the board remotely.
<ul>
<li><a href="/703#118">Network flashing through FTP</a></li>
<li><a href="/703#119">Network flashing through WEB</a></li>
</ul>

###Troubleshooting

<ul>
<li>With some network cards it can happen a long delay during flashing (up to two minutes or more) before the start of the proper writing phase. If this is your case try to change the speed of your PC Ethernet controller to <b>10 Mb/sec</b> Full Duplex in the <b>Control Panel</b> - <b>Network Connection</b> - <b>Local Area Connection</b> properties, clicking on the <b>Configure</b> button on the right side of the network card image:
<br>
Select there the <b>Advanced Tab</b>, and on the property  <b>Speed and Duplex</b> select <b>10 MB Full</b>
<li>On some PCs (especially laptops) there is a blocking function for packets like those that are used to flash the FOX Board Board. 
This block acts at driver level since the same netowrk card under Linux is able to flash the FOX Board without problems. 
The same problem is affecting the flashing capabilities from a vmWare image running inside Windows. 
</ul>

<a name="117"></a>
## Network flashing with Linux (or VMWare image inside Windows)

<span class="abstract">
This article explain how to flash a FOXLX using a PC with Ubuntu Linux 
</span>

Create a directory and save on it these two files:

* [boot_linux](http://www.acmesystems.it/download/foxlx/boot_linux)
* [etrax100boot](http://www.acmesystems.it/download/foxlx/etrax100boot)

set them as executable by typing:

<pre class="minicom">
$ <b>chmod +x boot_linux</b>
$ <b>chmod +x etrax100boot</b>
</pre>

Select an image to write from the @article='704'.

* Turn off your board 
* Close the J8 jumper

Launch the flash programmer on your PC by typing for example:

<pre class="minicom">
$ <b>sudo ./boot_linux -F -i fimageLX832_191107</b>
Using internal boot loader: INTERNAL_NW - Network boot (default).
Starting boot...
We're doing a flash write, this may take up to a few minutes...
</pre>

At this moment you have to on the FOX Board. If all is going well, 
you will see the ongoing process of the image transfer into the 
FLASH memory of the FOX Board with messages like these:

<pre class="minicom">
...
...
...
0x80360000: Writing 0x00010000 bytes
0x80370000: Writing 0x00010000 bytes
0x80380000: No need to write
0x80390000: No need to write
0x803a0000: Writing 0x00010000 bytes
0x80000000: Verifying...OK
JUMP
0x00000000
END
Exiting with code 0
</pre>

During the programming, the red LED of the FOX Board (DL1) is all the time on.

At the end of the programming phase the FOX Board will restart itself automatically.

<div class="info">
Remember to remove the jumper on J8 otherwise the FOX Board will not restart 
itself at the next startup.
</div>

These are some options you can use with the boot_linux command:

<ul>
<li><b>-d "device"</b>   The network interface to use, default is eth0.
<li><b>-f</b></t>	              Save the whole firmware image to flash except the rescue partition.
<li><b>-F</b>	              Save the whole firmware image to flash. NOTE that this will overwrite parameters stored in the rescue partition such as the serial number/MAC address.
<li><b>-h</b>	             Print help text (information on additional options not showed here)
<li><b>-i "image"</b>	  The path and name of the image to use, default is fimage.
<li><b>-p</b>	             Print the resulting <b>etrax<chip_version>boot</b> command instead of executing it.
</ul> 

This information becomes from:

* <a href="http://developer.axis.com/wiki/doku.php?id=axis:flash_howto" target="_window" >Axis article on howto flash</a>.

This is the <b>--h</b> output:

<pre class="minicom">
	debian:/home/fox/devboard-R2_01# <b>./boot_linux -h</b>    
	Prepending "/home/fox/devboard-R2_01/tools/build/bin" to PATH.
	Prepending "/usr/local/cris/bin" to PATH.
	
	AXIS boot_linux, $Revision: 1.16 $ $Date: 2004/11/01 16:32:27 $ 
	Copyright (C) 2001-2002 Axis Communications AB
	
	DESCRIPTION:
	  This program is used to boot (and flash) a linux image to a box.
	  It tries to extract the required ETRAX 100 settings from the image file.
	
	SYNTAX:
	  boot_linux [options]
	
	OPTIONS:
	  -b <bootfile>           : The boot image to use.
	  -d <device>             : The network interface to use, default is eth0.
	  -f                      : Save the image in the flash memory starting at
	                            address 0x10000.
	  -F                      : Save the image in the flash memory starting at
	                            address 0.
	  -h                      : Print this help text.
	  -i <image>              : The path and name of the image to use, default
	                            is fimage.
	  -o <offset>             : The offset in the flash where the flashing starts.
	  -O <offset>             : The offset in the image file where the flashing
	                            starts from.
	  -p                      : Print the resulting etrax100boot command instead
	                            of executing it.
	  -s <size>               : How much to flash (default is the size of the
				    flash minus the offset specified using -o or -f).
	  -S <size>               : The size of the flash.
	
	  All sizes and offsets above can be specified as decimal numbers, or as
	  hexadecimal numbers by prefixing them with 0x. It is also possible to use
	  the suffixes k and M to specify kilo (1024) or mega (1048576).
</pre>  

<a name="126"></a>
## Network flashing with Windows XP

In this article we explain how to flash a FOX Board with the LAN procedure from Windows(tm) XP without any SDK installed

This article is the result of the Windows XP porting, made by <b>John Crispin</b> of the e100boot and boot_linux Linux programs made originally by Axis Communications AB to flash ETRAX 100LX boards under Linux.

<a name='100'></a>
### Requirements

<ul>
<li> WinPcap 4.0 installed
<li> flashFOX.exe
</ul>

<a name='200'></a>
### Installing WinPcap 4.0
To be able to send and receive packets for flashing the FOX Board through 
the Ethernet network you need to have installed the WinPcap library release 4.0 for Windows. You can download the library from this link:

* <a href="http://www.winpcap.org/install/default.htm">http://www.winpcap.org/install/default.htm</a>

<a name='300'></a>

### Download flashFOX

You can download the <b>flashFOX</b> Windows XP application program flashFOX from this link:

* <a href="./flashFOX.exe">flashFOX.exe</a>

Now unzip it in your working folder where you have the fimage you want to flash the FOX Board with.

<a name='400'></a>

### How to use flashFOX.exe

Open a command prompt window on your window PC and go to the folder where the flashFOX.exe has been unzipped and put there the fimage to flash the FOX Board with.

The first thing to do with flashFOX is to search the right ethernet port between the adapters in your PC so to be able to direct the flashing packets to the FOX Board out from the right ethernet interface.

To be able to look at every interface in your PC flashFOX has to be invoked with the option <b>-l</b>.

<pre class="minicom">
D:\ACME\WORK>flashFox -l
                                          _                       _ _
                                         | |                     (_) |
  __ _  ___ _ __ ___   ___  ___ _   _ ___| |_ ___ _ __ ___  ___   _| |_
 / _` |/ __| '_ ` _ \ / _ \/ __| | | / __| __/ _ \ '_ ` _ \/ __| | | __|
| (_| | (__| | | | | |  __/\__ \ |_| \__ \ ||  __/ | | | | \__ \_| | |_
 \__,_|\___|_| |_| |_|\___||___/\__, |___/\__\___|_| |_| |_|___(_)_|\__|
                                 __/ |
                                |___/
     **************************************************************
     e100boot made by axis.se, ported for windows by acmesystems.it
                               feedback, bugs : info@acmesystems.it
     **************************************************************

The following devices are available
        1.) Adapter for generic dialup and VPN capture
        2.) Broadcom 440x 10/100 Integrated Controller

Use the -d <id> option to select the device

D:\ACME\WORK>
</pre>

As you can see, our ETH interface has the number <b>2.)</b>

At this moment you have to switch off (if it was on) the FOX Board, close the jumper <b>J8</b> (Ethernet flashing) 
on the FOX Board and switch it on again (with the FOX on the same LAN of the PC launching boot_linux). 

<p align="center">
<img src="./j8.png"/>
</p>

Now supposing your fimage is named my_fimage you can flash completely your Fox with this simple command:

<pre class="minicom">
D:\ACME\WORK>flashFOX -d 2 -F -i my_fimage
                                          _                       _ _
                                         | |                     (_) |
  __ _  ___ _ __ ___   ___  ___ _   _ ___| |_ ___ _ __ ___  ___   _| |_
 / _` |/ __| '_ ` _ \ / _ \/ __| | | / __| __/ _ \ '_ ` _ \/ __| | | __|
| (_| | (__| | | | | |  __/\__ \ |_| \__ \ ||  __/ | | | | \__ \_| | |_
 \__,_|\___|_| |_| |_|\___||___/\__, |___/\__\___|_| |_| |_|___(_)_|\__|
                                 __/ |
                                |___/
     **************************************************************
     e100boot made by axis.se, ported for windows by acmesystems.it
                               feedback, bugs : info@acmesystems.it
     **************************************************************

Using device Broadcom NetXtreme Gigabit Ethernet Driver
Using internal boot loader: INTERNAL_NW - Network boot (default).
Starting boot...
We're doing a flash write, this may take up to a few minutes...


Device ID = 0x00001b49
This bootloader was built by blogic on Mon Mar 5 10:29:02 CET 2007.
Checksum of bootloader is 0x000a0ac0
Waiting for load info.
Checksum of file is 0x00001ebd
Got load info.
SET_REGISTER
0xb0000000
0x000095f8
SET_REGISTER
0xb0000004
0x00000004
SET_REGISTER
0xb000000c
0x09603737
SET_REGISTER
0xb0000008
...
</pre>

<a name='500'></a>
### Complete options for flashFOX

To get the help menu of the flashFOX program for windows, invoke it with the <b>-h</b> option:

<pre class="minicom">
D:\ACME\WORK>flashFOX -h
                                          _                       _ _
                                         | |                     (_) |
  __ _  ___ _ __ ___   ___  ___ _   _ ___| |_ ___ _ __ ___  ___   _| |_
 / _` |/ __| '_ ` _ \ / _ \/ __| | | / __| __/ _ \ '_ ` _ \/ __| | | __|
| (_| | (__| | | | | |  __/\__ \ |_| \__ \ ||  __/ | | | | \__ \_| | |_
 \__,_|\___|_| |_| |_|\___||___/\__, |___/\__\___|_| |_| |_|___(_)_|\__|
                                 __/ |
                                |___/
     **************************************************************
     e100boot made by axis.se, ported for windows by acmesystems.it
                               feedback, bugs : info@acmesystems.it
     **************************************************************

Copyright (C) 2001-2002 Axis Communications AB

DESCRIPTION:
This program is used to boot (and flash) a linux image to a box.
It tries to extract the required ETRAX 100 settings from the image file.

SYNTAX:
$my_name [options]

OPTIONS:
-f                      : Save the image in the flash memory starting at
                                                  address 0x10000.
-F                      : Save the image in the flash memory starting at
                                                  address 0.
-h                      : Print this help text.
-i image              : The path and name of the image to use, default
                                                ¦ is fimage.
-p                      : Print the resulting etrax100boot command instead
                                                  of executing it.
-P                      : Print the resulting etrax100boot
-l                      : Print a list of network devices that are available
-d <id>                 : Choose which device you want to use
                          Use the -l option to get a list of devices

All sizes and offsets above can be specified as decimal numbers, or as
hexadecimal numbers by prefixing them with 0x. It is also possible to use
the suffixes k and M to specify kilo (1024) or mega (1048576).

D:\ACME\WORK>
</pre>

<a name="125"></a>
## Network flashing with another FOX Board

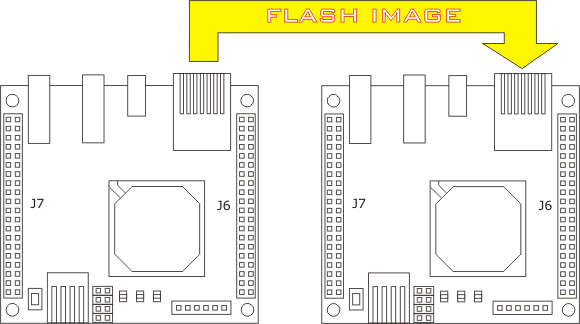
In this article we'll illustrate how to flash the entire fimage of a FOX Board from another FOX Board. This application is very useful to transfer the production 
fimage on the FOX Boards during hi-volume manifacturing without the use of a dedicated Linux PC
<center>
<img src="./foxflashing.png">
</center>

<b>etrax100boot </b> is the utility wrote by Axis to program the FLASH memory used by ETRAX 100LX CPU to make the boot, through the LAN. This is the main
and faster method used during the first initialization of the ETRAX based boards included the FOX.

This utility is already included inside the Axis SDK in a ready to use executable file for PC. But due to the heavy environment and less space usually available inside 
the factory, it can be a better choice to use a solid state alternative to PC to make the initialization of the FOX Boards.

### etrax100boot porting

In the download section of this article it is possible to download the executable version for the FOX Board of the etrax100boot utility with a simple script to launch it.

<ul>
<li>Copy etrax100boot and flashfox script in the <b>/mnt/flash</b>
<li>Copy a ready FOX Board image on <b>/var</b> directory or on a USB key.
<li>Change the default FOX Board IP to avoid an IP conflict after the flash phase
<li>Mount the USB key if needs. i.e.
<pre class="minicom">
mount -t vfat /dev/sda1 /mnt/1
</pre>
<li>Connect the blank FOX to the programmer FOX by a cross cable 
<li>Close the LAN boot jumper on the blank FOX Board  and reset it
<li>Launch the foxflash script followed by the fimage name and path:
<pre class="minicom">
./foxflash /mnt/1/myimage
</pre>
</ul>

### Download

<ul>
<li>Executable file of etrax100boot for the FOX Board (using glibc): <a href="./etrax100boot">etrax100boot</a>
<li>Simple bash script to use etrax100boot: <a href="./flashfox">flashfox</a>
</ul> 

<a name="118"></a>
## Network flashing through FTP

This article describes how to reprogram the FLASH memory using an FTP client

The FOX Board has an FTP server to enable file transfers in and out its filesystem.
There are two special files that, if correctly used, enable the complete reprogramming of the
memory FLASH. This permits, obviously to update the firmware of a product based on FOX board even 
from remote through a simple TCP/IP connection. This procedure, which will update the kernel part and the mnt/flash part of the FLASH chip, will also maintain the original Mac Address, stored in the FLASH bootblock.

The two files are:

<ul>
<li><b>flash</b>
<br>
that permits to update the FOX FLASH read only partition of the FOX filesystem containing the 
kernel image maintaining the personal data on the FOX FLASH read write partition.

<li><b>flash_all</b>
<br>
that permits to rewrite completely all tha FLASH memory inside the FOX.
All the new data transferred into the FOX after the previous flash_all will be lost.
</ul>

It is possible to use any FTP client to connect to the FOX board with the following credentials:
username <b>root</b> and password <b>pass</b>. 

Let's see an example:

<pre class="minicom">
$<b>ftp 192.168.0.90</b>
Connected to 192.168.0.90.
220 Fox Linux Board release 2.00 (mag 26 2005) ready.
Name (192.168.0.90): <b>root</b>
331 User name okay, need password.
Password: <b>pass</b>
230 User logged in, proceed.
Remote system type is UNIX.
Using binary mode to transfer files.
ftp> <b>put fimage flash_all</b>
local: fimage remote: flash_all
227 Entering Passive Mode (192,168,0,90,12,0)
150-Shutting down processes.
Preparing system for upgrade ...
</pre>

During the programming phase the red led (DL1) of the FOX board remains all the time on.

<a name="119"></a>
## Network flashing through WEB

This article describes how to reprogram the FLASH memory using a web browser

Into the default <a href="?id=54">Web page</a> available on the FOX Board 
there are two links that permit to upload a new image on the FOX Board flash memory:

<ul>
<li><b>Update FOX firmware - system area</b>
<br>
this link enable the update the read only partition of the FOX board containing the kernel 
image maintaining the personal data on the FOX Board flash read write partition

<li><b>Update FOX firmware - entire system</b>
<br>
this link enable to upgrade all the FLASH memory. All the data inside the FOX memory will be overwritten.
</ul>

You need only to click on the preferred link and select the file containing the image to store 
into the FOX FLASH memory.

During the programming phase the red led (DL1) remains all the time on.

## Links

* [How to flash upgrade](https://www.axis.com/techsup/dev/flash-howto.htm)


@shop='FOXLX832'
