Install the Phrozen SDK on Win XP
Unfortunately there isn't a version of Phrozen SDK that can runs on Windows. The easiest way to do that is to use a Virtual Machine like VMWare that can runs a Linux systems on your desktop. Fortunately VMWare release a free version of a player that can runs prebuilt images of ready to use operative systems.
From this page you can download a VMWare image with Linux Debian Sarge 3.1 and the complete Phrozen SDK already installed.
Installation steps
|
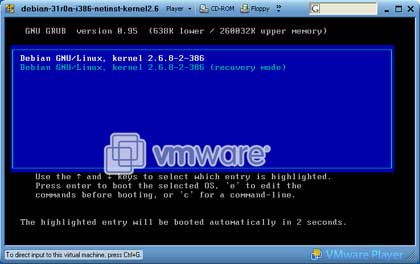
Booting linux inside a VMWare session
|
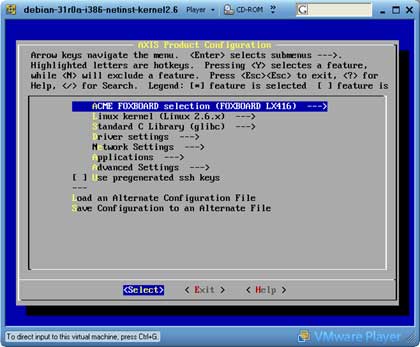
Now your Phrozen SDK is ready to use.
How to copy files between Windows and the Virtual Machine
Linux Debian Sarge 3.1 has by default a SSH server already installed. SSH is like a FTP server but is not integrated in Windows so to exange files between Windows and the Virtual Machine you have to use WinSCP, a freeware SSH client for Windows.
Check the IP address of Linux Virtual Machine typing:
debian:/home/fox/devboard-R2_01# ifconfigChange the IP on the fly if it needs typing:
debian:/home/fox/devboard-R2_01# ifconfig eth0 192.168.0.91
Then start WinSCP from windows:
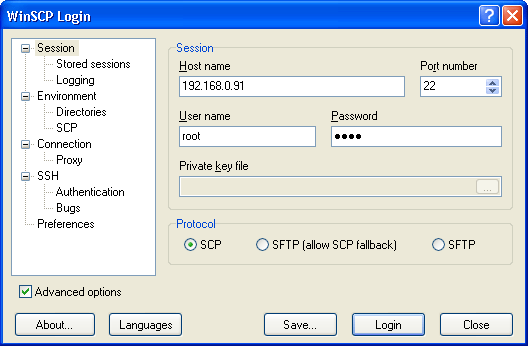
A WinSCP Login configuration box
and set:
- Host name: 192.168.0.91
- Port number: 22
- User name: root
- Password: pass
- Protocol: scp
Now press Save if you want to save your configuration or Login to have access to the virtual machine:
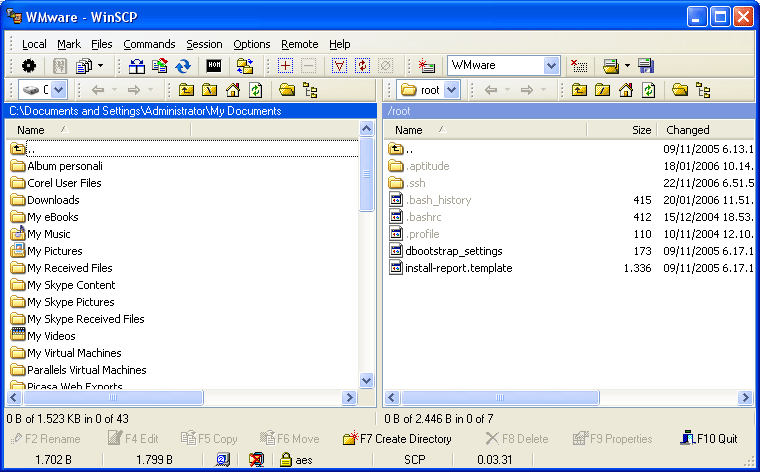
WinSCP directory view
On the left you have now the directory tree of your real Windows machine and on the right the directory tree of the virtual machine.
To copy a file from a directory tree to another just drag and drop it.
How to continue now
With the SDK you can compile your own applications, make a porting of applications available on Internet, change the Kernel configuration, etc.To do that, follow the articles available in the SDK How Tos section of the .
WMWare troubleshooting
This is a list of how to resolve some problems that you could meet using VMware instead of a real Linux machine.How to transfer the fimage to the flash memory of the FOX Board
It is possible to re-program the whole flash memory contents with a new flash image by ethernet, web or ftp. See this article for more info: to re-program the flash memory through ethernet from the Virtual Machine you have to configure the ethernet board as a bridge as shown in this picture:
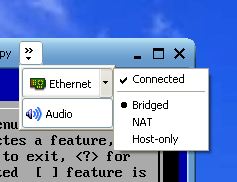
Ethernet configuration on VM
After that set the eth0 IP address of the Linux VM using an address visible from the FOX Board like 192.168.0.91 typing:
debian:/home/fox/devboard-R2_01# ifconfig eth0 192.168.0.91then start the programming typing:
debian:/home/fox/devboard-R2_01# boot_linux -fOn the FOX Board close the BOOT jumper and reset.
The -f option will update the read only partition maintaining all the changes made on the rewritable filesystem (configuration file changes and user added applications). In this way you can change the only the system files mantaining application and configuration files.
To completely rewrite the whole Flash memory (including the MAC address configuration) use:
debian:/home/fox/devboard-R2_01# boot_linux -F
By default boot_linux uses fimage as default image file. To specify a different filename use:
debian:/home/fox/devboard-R2_01# boot_linux -f -i filename
Change the keyboard layout
The default keyboard layout of this VMware image is US. To change it type:
# kbdconfigselect Select keymap from full list and then the keyboard layout of your country.
Alternative method to change the keyboard layout
Load the right keyboard layout choosing from the right one in the /usr/share/keymaps/i386/qwerty directory and load it with the loadkeys command. For example to load the Italian keyboard layout the right command is:# loadkeys /usr/share/keymaps/i386/qwerty/it.kmap.gz
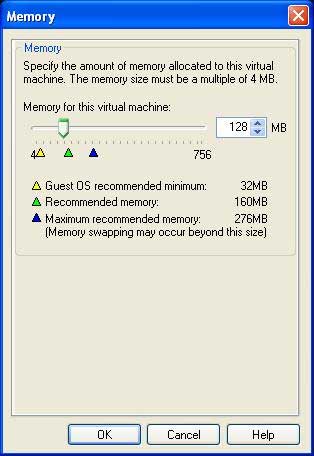
Setting Memory Size of VM
Contribute of F. StanischewskiWhen initially installed the VMplayer allocates 256 MB of RAM. The VM will run properly with 128 MB also. To change the size edit the *.vmx file with a text editor
memsize = "256"to
memsize = "128"Additionally you can do it via the VMplayer menu under Player -> Troubleshoot -> Change Memory Allocation...
Configuring floppy drive
Contribute of F. StanischewskiEdit the *.vmx file with text editor If a floppy exists
floppy0.fileName = "A:"or if not
floppy0.present = "FALSE"
Configuring CD-ROM drive
Contribute of F. StanischewskiIn the initial installation the CD-ROM drive is configured for a Linux system:
ide1:0.present = "TRUE"
ide1:0.fileName = "/dev/cdrom"
ide1:0.deviceType = "atapi-cdrom"
In case of a Windows system you have to edit the *.vmx file with text editor and replace lines with following contents
ide1:0.present = "TRUE"
ide1:0.fileName = "auto detect"
ide1:0.deviceType = "cdrom-raw"
ide1:0.autodetect = "TRUE"
ide1:0.startConnected = "TRUE"
Problems after restart with network connection
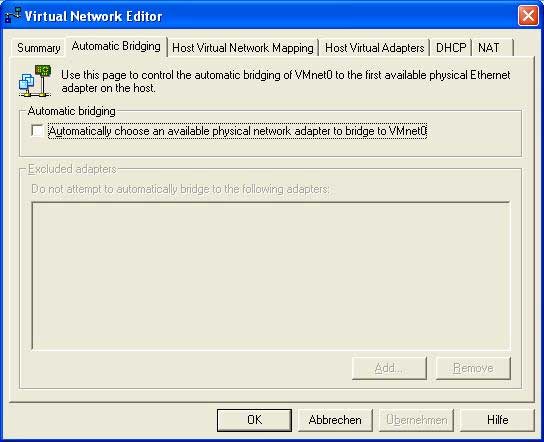
Contribute of F. StanischewskiAfter shutting down the VM Player and restarting it sometimes the network connection gets broken. The reason for this is the "Automatic Bridging" of the VM Player to a network adapter in bridging mode. To get back the connection start the program vmnetcfg.exe in the directory where the vmplayer.exe is installed. Go to the Automatic Bridging page and switch off automatic bridging
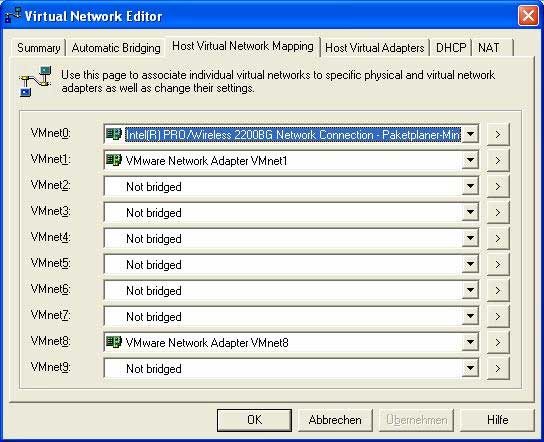
Go to the Host Virtual Network Mapping page and select for VMnet0 an existing network adapter
Access of files of the VM by the host system
Contribute of F. StanischewskiThe VM system is a completely capsulated system. So, there are two diferent files systems. To enable files access the easiest way is to install Samba on the VMplayer Linux system. Then a new drive can be mounted inside to host system.
Update Not Possible in VMWare or sdk_version does not display the version number
If you are not able to execute the sdk_update or if issuing the command sdk_version you do not get any version number, like here reported:
debian:/home/fox/devboard-R2_01# ./sdk_version

---------------------SDK VERSION INFO---------------------
           Your SDK is currently at version             <---- number version missing !!!
----------------------------------------------------------
probably your Linux configuration about default gateway or nameserver are wrong and you are not able to reach internet from inside the VMWare Linux machine. With a quick ping to a internet website you can check that this is occurring. If you are unable to ping any internet site from inside the VMWare Linux neither inserting its name (like: ping www.acmesystems.it) nor with its IP address (like: ping 80.241.169.67) then your default gateway to internet of the Linux vmWare machine is configured wrongly.
To set the proper gateway in your VMWare Linux environment enter this command:
debian:/home/fox/devboard-R2_01# route add default gw xxx.xxx.xxx.xxx eth0where xxx.xxx.xxx.xxx is the IP address of the gateway to internet in your internal LAN.
If you instead are able to reach an internet site with a ping to its numerical IP address but not with a ping to its name then your gateway is set correctly but your nameserver settings are not correct so your Linux VMWare is unable to reach a DNS server to convert the name address in its IP address.
To set correctly the nameserver information inside the VMWare Linux machine edit the file /etc/resolv.conf and insert the IP address of one or more DNS servers like in the following:
-------- content of /etc/resolv.conf --------
.
.
nameserver 212.216.112.112
nameserver 212.216.172.62
Sometimes inside /etc/resolv.conf is written, as nameserver, the IP of the internal LAN gateway. In this way Linux is delegating the DNS operations to your internet provider but it happens sometimes that the LAN router is not forwarding correctly the information to your internet provider so that the resolution of the destination IP is not executed. Inserting as nameservers one or more correct addresses of working DNS servers will permit to your VMWare Linux machine to be able to reach internet and complete correctly the sdk_version and sdk_update commands.
