Yarm technical documentation
Getting Started with RIOT and YARM
RIOT is a real-time multi-threading operating system that supports a range of devices that are typically found in the Internet of Things (IoT): 8-bit, 16-bit and 32-bit microcontrollers

This short tutorial shows the necessary steps to install all the tools used to develop applications based on RIOT, running on Yarm devices.
Please note : This procedure has been tested on a PC running Virtual Box VM, Host Win10 Pro 64, Guest Ubuntu 22.04 64.
Preparing your system for RIOT
First we download all the necessary tools
Development / Compile Tools
System compiler, linker, make etc.
sudo apt install build-essential
Toolchain
Arm cross-compiler for Yarm SAM L21E18B MCU.
sudo apt-get install gcc-arm-none-eabi
Git
Git version control tool.
sudo apt install git
Edbg
Command line utility for programming ARM-based MCUs through CMSIS-DAP SWD interface on Atmel-ICE.
cd ~
git clone https://github.com/ataradov/edbg.git
cd edbg/
sudo cp 90-atmel-edbg.rules /etc/udev/rules.d/
sudo udevadm control --reload
sudo apt-get install libudev-dev
make
Install pip
Pip is the package installer for Python
sudo apt install python-pip
Install RIOT (Antonio Galea branch for yarm radio)
Thanks to Antonio, it is possible to use the ATA8510 chip of the Yarm on RIOT.
Download RIOT from Git
Main branch.
cd~
git clone https://github.com/ant9000/RIOT.git
Branch to yarm radio by Antonio Galea.
cd RIOT
git checkout yarm_radio
Cross platform utilities
If developing on a 64 bit platform, install these to run 32 bit apps.
sudo apt-get install gcc-multilib
sudo apt-get install g++-multilib
Install python module pySerial
This module is used by pyterm, a python based serial terminal, included in the RIOT repository
pip install pyserial
Install python module twisted
"twisted is an event-based framework for internet applications, supporting Python 3.6+."
pip install twisted
First RIOT test application
Once the installation is completed, let's check that everything was properly done by running the following test.
Setup programming connections
First of all we must prepare the right setup to program the YARM.
Connections to PC, Atmel-ICE, YARM-2_ICE and YARM DEV are shown in the following picture
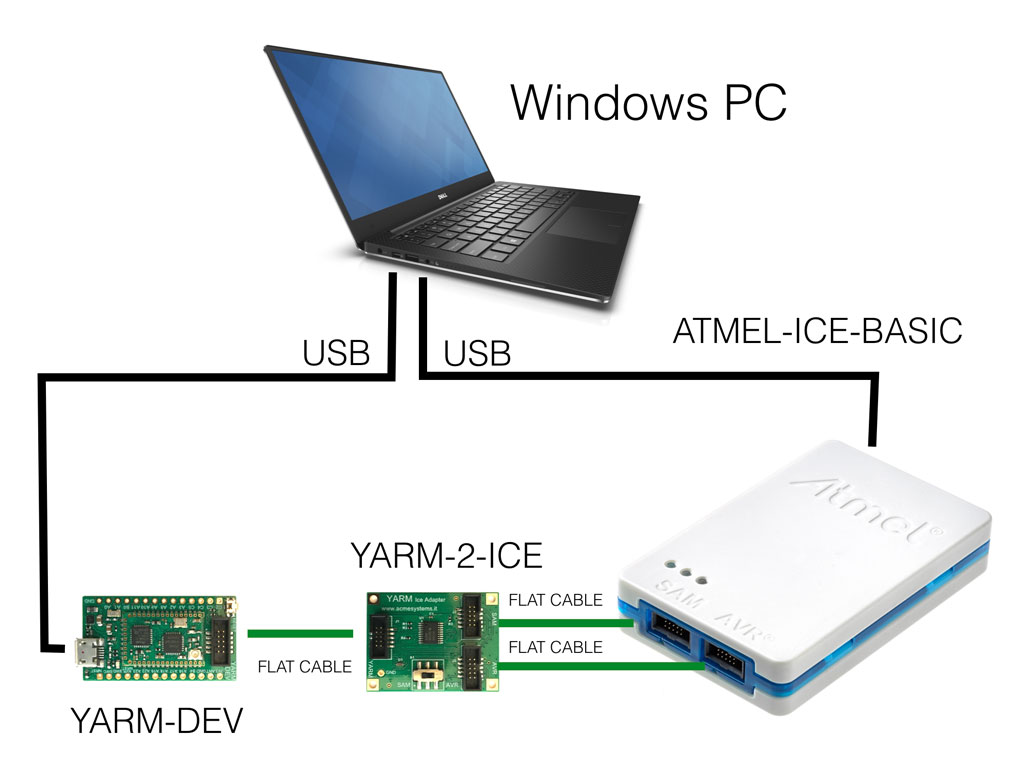
Make sure the switch on the YARM-2-ICE is set to SAM
Create a workspace folder
cd~
mkdir workspace
In workspace create a first test folder
cd workspace
mkdir riot_first
cd riot_first
Create and save this Makefile
APPLICATION = Task01
BOARD = yarm
RIOTBASE = /home/$(USER)/RIOT
CFLAGS += -DDEVELHELP
QUIET ?= 1
USEMODULE += shell
USEMODULE += shell_commands
USEMODULE += ps
include $(RIOTBASE)/Makefile.include
Create and save this main.c file
#include <stdio.h>
#include <string.h>
#include "shell.h"

int main(void)

{
int j;
int i=0;

    for(j=0;j<25500000;j++);
    printf("This is Task-01");
    while(1)
    {
        for(j=0;j<5500000;j++);
        printf("Running  %8x - %2x\n",i, i%0x10);
        i++;
    }
    return 0;
}
Compile, flash
The following command will compile and link the source code, flash the MCU, then execute the terminal emulator
make all flash term
A successful compile and link procedure looks like this :
Building application "Task01" for "yarm" with MCU "saml21".
"make" -C /home/user/RIOT/boards/yarm
"make" -C /home/user/RIOT/core
"make" -C /home/user/RIOT/cpu/saml21
"make" -C /home/user/RIOT/drivers
"make" -C /home/user/RIOT/sys
"make" -C /home/user/RIOT/drivers/periph_common
"make" -C /home/user/RIOT/sys/auto_init
"make" -C /home/user/RIOT/sys/event
"make" -C /home/user/RIOT/sys/isrpipe
"make" -C /home/user/RIOT/cpu/cortexm_common
"make" -C /home/user/RIOT/sys/newlib_syscalls_default
"make" -C /home/user/RIOT/sys/auto_init/usb
"make" -C /home/user/RIOT/cpu/sam0_common
"make" -C /home/user/RIOT/sys/pm_layered
"make" -C /home/user/RIOT/cpu/saml21/periph
"make" -C /home/user/RIOT/sys/ps
"make" -C /home/user/RIOT/sys/shell
"make" -C /home/user/RIOT/sys/shell/commands
"make" -C /home/user/RIOT/sys/tsrb
"make" -C /home/user/RIOT/sys/usb/usbus
"make" -C /home/user/RIOT/cpu/sam0_common/periph
"make" -C /home/user/RIOT/cpu/cortexm_common/periph
"make" -C /home/user/RIOT/sys/usb/usbus/cdc/acm
text data bss dec hex filename
23432 136 5856 29424 72f0 /home/user/workspace/riot_first/bin/yarm/Task01.elf
Then the MCU is flashed
/home/user/RIOT/dist/tools/edbg/edbg --target saml21 --verbose --file /home/user/workspace/riot_first/bin/yarm/Task01.bin --verify || /home/user/RIOT/dist/tools/edbg/edbg --target saml21 --verbose --file /home/user/workspace/riot_first/bin/yarm/Task01.bin --verify --program
Debugger: ATMEL Atmel-ICE CMSIS-DAP J41800017751 01.24.007E (SJ)
Clock frequency: 16.0 MHz
Target: SAM L21E18B (Rev C)
Verification.......
at address 0x4e0 expected 0x88, read 0x84
Error: verification failed
Debugger: ATMEL Atmel-ICE CMSIS-DAP J41800017751 01.24.007E (SJ)
Clock frequency: 16.0 MHz
Target: SAM L21E18B (Rev C)
Programming................................................................................................ done.
Verification................................................................................................ done.
Entering terminal and monitoring program execution
sleep 2
/home/user/RIOT/dist/tools/pyterm/pyterm -p "/dev/ttyACM0" -b "115200"
2023-06-01 16:07:58,007 # Connect to serial port /dev/ttyACM0
Welcome to pyterm!
Type '/exit' to exit.
2023-06-01 16:07:59,036 # Running 4 - 4
2023-06-01 16:07:59,036 # Running 5 - 5
2023-06-01 16:07:59,112 # Running 6 - 6
2023-06-01 16:07:59,576 # Running 7 - 7
2023-06-01 16:08:00,040 # Running 8 - 8
2023-06-01 16:08:00,503 # Running 9 - 9
2023-06-01 16:08:00,967 # Running a - a
2023-06-01 16:08:01,431 # Running b - b
2023-06-01 16:08:01,894 # Running c - c
2023-06-01 16:08:02,358 # Running d - d
2023-06-01 16:08:02,822 # Running e - e
2023-06-01 16:08:03,285 # Running f - f
2023-06-01 16:08:03,748 # Running 10 - 0
2023-06-01 16:08:04,212 # Running 11 - 1
/exit
2023-06-01 16:08:04,337 # Exiting Pyterm
Notes
Some additional tools could be installed to facilitate code development / debug
 Gtkterm Gnome serial terminal, useful when using the onboard Yarm usb connector as a monitor / debug port.
 Geany is a lightweight programmer's text editor.
 Meld helps you compare files, directories, and version controlled projects..
Reference
Related products
Features
Index
Low-cost ISM 868MHz radio module
- CPU Microchip SAML21 + Microchip ATA8510
- Cortex M0+ @ 48 MHz
- Size: 22x14 mm
- Up to 10 Km in free space and tens of meters in buildings
- Open source firmware based on RIOT the Real Time Operating System for IoT
Fabrizio Rinalduzzi
Hardware designer, firmware and (sometimes) software developer, with a soft spot for compiled code and good music.
"A common mistake that people make when trying to design something completely foolproof
is to underestimate the ingenuity of complete fools."
-Douglas Adams-
Webpage:
Fabrizio Rinalduzzi Electronic Systems DESIGN ---

Home page Yarm technical documentation