Implementing a KISS radio link using YARM and RIOT
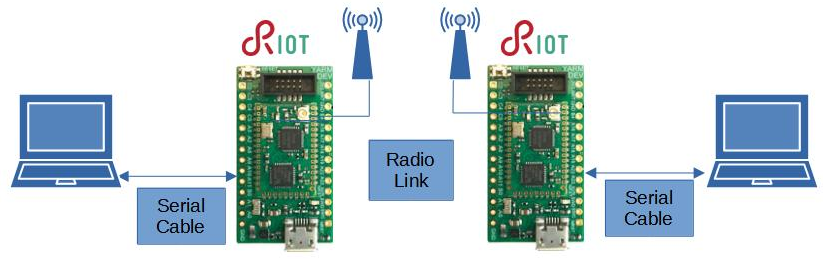
This tutorial implements a radio link based on RIOT, running on Yarm devices.
Please note :
- This procedure has been tested on a PC running Virtual Box VM, Host Win10 Pro 64, Guest Ubuntu 22.04 64
- The code development is based on Getting Started with RIOT and YARM
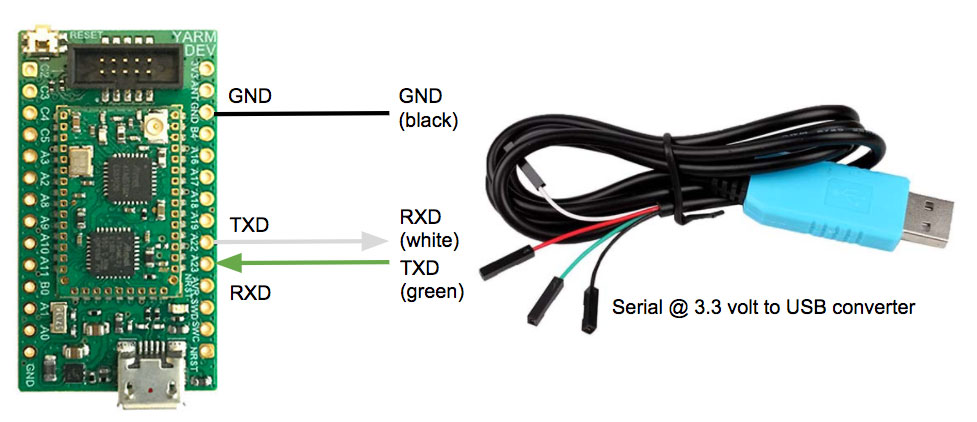
How to connect a PC to the YARM-DEV Uart
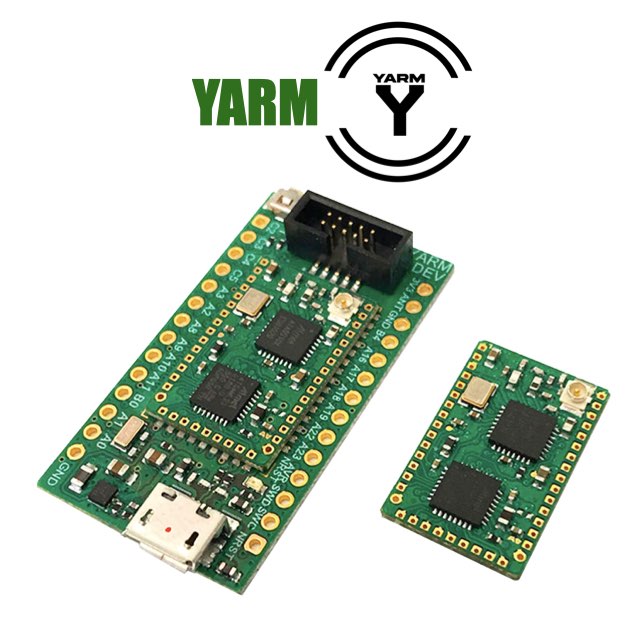
As shown in the previous picture the radio link uses two YARM-DEV. Each YARM-DEV has a serial connection to a PC USB port by means of a USB to Serial 3V3 converter. The following picture shows this connection to the UART of the YARM-DEV board exposed on the Pins 22, 23.
Implementing this application, some interesting features of RIOT will be used :
- Xtimer API, with initialization and sleep.
- Uart API, with initialization, handling and callback.
- ATA8510 API, with initialization, handling and callback.
- Ringbuffer API, with initialization, peek, read, write
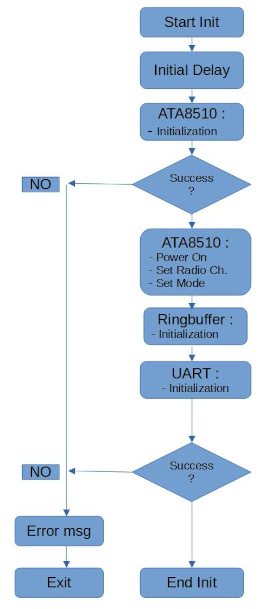
Application Start
The following flow chart describes the operations performed at application start up.
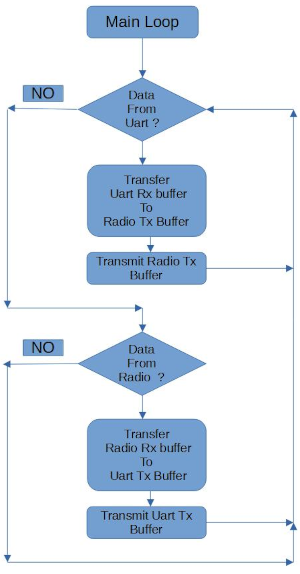
Application Main loop
This is the main loop flow chart
Application c source code
//
//  yarm_kiss_radiolink.c
//

#include <stdio.h>
#include <stdlib.h>
#include <string.h>

#include "thread.h"
#include "xtimer.h"
#include "od.h"
#include "msg.h"
#include "ringbuffer.h"

#include "board.h"

#define ENABLE_DEBUG (0)
#include "debug.h"

// ===========================================================
//                                                           =
//  UART : INCLUDES, DEFINES, STRUCTS, VARIABLES, FUNCTIONS  =
//                                                           =
// ===========================================================
#include "periph/uart.h"
#include "periph/gpio.h"

#define UART_PORT           UART_DEV(0)
#define UART_SPEED          115200UL
//  Uart buffer depth
#define UART_BUF_SIZE       (128U)

//  Uart buffer type
typedef struct {
    char rx_mem[UART_BUF_SIZE];
    ringbuffer_t rx_buf;
} uart_ctx_t;

//  Uart buffer
static uart_ctx_t u_ctx;

//  Uart rx callback, pushes incoming data into uart ringbuffer
static void rx_cb(void *arg, uint8_t data)
{
    (void)arg;
    ringbuffer_add_one(&u_ctx.rx_buf, data);
}

//  Enables pullups on Uart pins.
void b_init(void)
{
    //  add pullups to UART0 pins
    PORT->Group[PA].PINCFG[22].bit.PULLEN = 1;
    PORT->Group[PA].PINCFG[23].bit.PULLEN = 1;
}
// ===========================================================


// -----------------------------------------------------------
//                                                           -
//  RADIO : INCLUDES, DEFINES, STRUCTS, VARIABLES, FUNCTIONS -
//                                                           -
// -----------------------------------------------------------
#include "ata8510_params.h"
#include "ata8510.h"
#include "ata8510_internals.h"

static ata8510_t dev;
//  Radio buffer depth
#define RADIO_BUF_SIZE       (128U)

//  Radio buffer type
typedef struct {
    char rx_mem[RADIO_BUF_SIZE];
    ringbuffer_t rx_buf;
} radio_ctx_t;

//  Radio buffer
static radio_ctx_t r_ctx;

//  Transmits data over the radio channel
void send(uint8_t *buffer, size_t len)
{
    printf("SENDING %d bytes\n", len);
    od_hex_dump(buffer, len, 0);
    ata8510_send_frame(&dev, buffer, len);
}

//  Radio rx callback, pushes incoming data into radio ringbuffer
void recv(uint8_t *buffer, int len, int dbm)
{
    printf("RECEIVED %d bytes, dBm=%d\n", len, dbm);
    ringbuffer_add(&r_ctx.rx_buf, (char *)buffer, len);
    free(buffer);
}
// -----------------------------------------------------------


// +++++++++++++++++++++++++++++++++++++++++++++++++++++++++++
//                                                           +
//  Main function                                            +
//                                                           +
// +++++++++++++++++++++++++++++++++++++++++++++++++++++++++++
int main(void)
{
char sermsg[100];
int cnt=0;
uint8_t counter=0;
int c;
int res;

    //  Initial delay, gives time to the USB RIOT device to be detected by terminal OS.
    xtimer_sleep(3);

    //  Welcome Msg
    printf("YARM kiss radiolink! "__DATE__" "__TIME__);

    //
    //  Radio chanel setup
    //
    //  ATA8510 Init with error handling
    switch (ata8510_init(&dev, &ata8510_params[0]))
    {
        case -ATA8510_ERR_MALLOC:
            puts("[Error] Cannot allocate memory.");
            return -1;
        case -ATA8510_ERR_SIGNATURE:
            puts("[Error] Wrong device signature found.");
            return -1;
        case -ATA8510_ERR_SPI:
            puts("[Error] An error occurred when initializing SPI bus.");
            return -1;
        case -ATA8510_ERR_GPIO_INT:
            puts("[Error] An error occurred when initializing interrupt pin.");
            return -1;
        case -ATA8510_ERR_GPIO_POWER:
            puts("[Error] An error occurred when initializing poweron pin.");
            return -1;
        case -ATA8510_ERR_GPIO_RESET:
            puts("[Error] An error occurred when initializing reset- pin.");
            return -1;
    }

    //  Define radio rx callback function
    dev.receive_cb = recv;
    //  Power on radio device
    ata8510_poweron(&dev);
    //  Select radio service and channel
    ata8510_set_radio_service_channel(&dev, ATA8510_SERVICE_2, ATA8510_CHANNEL_0);
    //  Wait radio setup
    xtimer_sleep(1);

    //  Radio device in Rx mode
    ata8510_set_mode(&dev, ATA8510_MODE_RX);
    //  Wait radio setup
    xtimer_sleep(1);

    //  Init radio rx ringbuffer
    ringbuffer_init(&r_ctx.rx_buf, r_ctx.rx_mem, RADIO_BUF_SIZE);


    //
    //  Uart setup
    //
    //  Init uart rx ringbuffer
    ringbuffer_init(&u_ctx.rx_buf, u_ctx.rx_mem, UART_BUF_SIZE);
    //  Init uart, with error handling
    res = uart_init(UART_PORT, UART_SPEED, rx_cb, NULL);
    if (res == UART_NOBAUD)
    {
        printf("Error: Give baudrate (%lu) not possible\n", UART_SPEED);
        return 1;
    }else{
        if (res != UART_OK)
        {
            puts("Error: Unable to initialize UART device");
            return 1;
        }
    }
    b_init();
    printf("Success: Initialized UART at BAUD %lu\n", UART_SPEED);

    printf("Initialization OK.");

    //
    //  Main loop
    //
    while(1)
    {
        //  Check incoming data from Uart
        c = ringbuffer_peek_one(&u_ctx.rx_buf);
        if ((c == -1))
        {
            //  No incomingdata from Uart
            //  Check incoming data from Radio
            c = ringbuffer_peek_one(&r_ctx.rx_buf);
            if ((c == -1))
            {
                //  Neither Radio nor Uart incoming data available
                counter=(counter+1)%10;
                //  Take a nap...
                xtimer_sleep(1);
            }else{
                //  Data available on Radio, send to Uart
                c = ringbuffer_get_one(&r_ctx.rx_buf);
                cnt =0;
                memset(sermsg, 0, sizeof(sermsg));
                while(c>0)
                {
                    sermsg[cnt]=c;
                    c = ringbuffer_get_one(&r_ctx.rx_buf);
                    cnt++;
                }
                printf("Radio To Uart  %s", sermsg);
                uart_write(UART_PORT,(uint8_t *)sermsg, cnt);
            }
        }else{
            //  Data available on Uart, send to Radio
            c = ringbuffer_get_one(&u_ctx.rx_buf);
            cnt =0;
            memset(sermsg, 0, sizeof(sermsg));
            while(c>0)
            {
                sermsg[cnt]=c;
                c = ringbuffer_get_one(&u_ctx.rx_buf);
                cnt++;
            }
            printf("Uart To Radio %s", sermsg);
            send((uint8_t *)sermsg, cnt);
        }
    }

    return 0;
}
Development setup
Install RIOT
Install RIOT as from * Getting Started with RIOT and YARM
Create the project subfolder
Create and save this Makefile
APPLICATION = yarm_kiss_radiolink
BOARD = yarm
RIOTBASE = /home/$(USER)/RIOT
QUIET ?= 1
DEVHELP ?= 1

USEMODULE += ata8510
USEMODULE += od_string
USEMODULE += xtimer

FEATURES_REQUIRED += periph_uart

CFLAGS += -DCONFIG_USBUS_CDC_ACM_STDIO_BUF_SIZE_EXP=12
CFLAGS += -DTHREAD_STACKSIZE_IDLE=THREAD_STACKSIZE_DEFAULT

include $(RIOTBASE)/Makefile.include
Create c source code file
Copy the c sorce code in a new file named yarm_kiss_radiolink.c in the project subfolder
Compile and Flash
Compile the program, then flash both YARM-DEV boards.
Testing
- Connect each YARM-DEV Serial port to a PC USB port by means of the USB to Serial cable (Comm Port).
- Open a serial terminal application on the PC connected to Serial port associated to the YARM-DEV UART
- Connect each YARM-DEV USB port to a PC USB port (Debug Port).
- Open a serial terminal application on the PC connected to Serial port associated to the YARM-DEV USB
Running Output
Run a terminal program on YARM-DEV A Debug Port :
Run a terminal program on YARM-DEV B Debug Port :
YARM-DEV A debug output
YARM-DEV B debug output
Connect the PCs to the Comm Serial Port of both YARM-DEV A and YARM-DEV B, then
- Send a string from YARM-DEV A to YARM-DEV B
- Send a string from YARM-DEV B to YARM-DEV A
In the previous terminal outputs it is clearly shown that a "Transmit Test : A->B" was first sent from YARM-DEV A to YARM-DEV B, then a "Transmit Test : B->A" was sent from YARM-DEV B to YARM-DEV A.
Conclusion
This is a very simple example to show how, with few code lines, it is easy to implement a radio link with two YARM devices. It is, however, a good starting point to develop more complex applications.
Reference
Related products
Hardware designer, firmware and (sometimes) software developer, with a soft spot for compiled code and good music.
"A common mistake that people make when trying to design something completely foolproof is to underestimate the ingenuity of complete fools." -Douglas Adams-
Webpage: Fabrizio Rinalduzzi Electronic Systems DESIGN ---