Write on NANDFLASH end EMMC memories with SAM-BA 3.7
In this article is used the command line version of SAM-BA version 3.7 that support the latest generations of Microchip MPUs.
Installing SAM-BA 3.7
Download the package from Microchip site:
mkdir acqua
wget https://ww1.microchip.com/downloads/aemDocuments/documents/MPU32/ProductDocuments/SoftwareLibraries/Firmware/sam-ba_v3.7-linux_x86_64.tar.gz
Uncompress the tar.gz file:
tar xvf sam-ba_v3.7-linux_x86_64.tar.gz
Move inside the new directory created by tar
cd sam-ba_v3.7-linux_x86_64
Using SAM-BA
SAM-BA comunicates with the CPU trought the USB client port of Acqua.
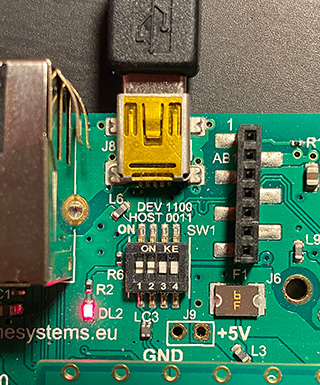
If you are using a Berta board set the SW1 switches in this way: 1100.
It is also important that the CPU is not booting Linux so:
- Remove any microSD from the microSD holder
- Jump the BOOT pin on Berta board to GND to avoid the bootstrap from the NAND flash (just if you are using an Acqua board with NAND flash on board)
- Turn-on the board
- Detach the BOOT pin from GND
If everything is OK on the Debug serial port the message RomBOOT will
appear and the port /dev/ttyACM0 became active on our Linux PC
sudo dmesg | grep ttyACM0
[171999.990681] cdc_acm 1-10:1.0: ttyACM0: USB ACM device
Type the command:
lsusb
...
Bus 001 Device 019: ID 03eb:6124 Atmel Corp. at91sam SAMBA bootloader
...
Select the memory you need to manage:
NANDFLASH
Erase the whole NANDFLASH
sudo ./sam-ba -p usb -b sama5d3-xplained -a nandflash -c erase
Write the bootloader
sudo ./sam-ba -p usb -b sama5d3-xplained -a nandflash -c writeboot:at91bootstrap.bin
When a bootloader is loaded inside the NANDFLASH to have access again to the NANDFLASH via SAM-BA close the BOOT pin of Berta Board to GND to avoid that At91bootstrap starts.
Write to memory from a file
-c write:<filename>:[<addr>]
Examples: write and verify at91bootstrap.bin at begin of NANDFLASH
sudo ./sam-ba -p usb -b sama5d3-xplained -a nandflash -c write:at91bootstrap.bin
sudo ./sam-ba -p usb -b sama5d3-xplained -a nandflash -c verify:at91bootstrap.bin
Read memory to file
Read the whole NANDFLASH content and save in in a file called firmware.bin
sudo ./sam-ba -p usb -b sama5d3-xplained -a nandflash -c read:firmware.bin
The general format of -c read command is:
-c read:<filename>:[<addr>]:[<length>]
for example:
-c read:firmware.bin              read all to firmware.bin
-c read:firmware.bin:0x1000       read from 0x1000 to end into firmware.bin
-c read:firmware.bin:0x1000:1024  read 1024 bytes from 0x1000 into firmware.bin
-c read:firmware.bin::1024        read 1024 bytes from start of memory into firmware.bin
Verify memory from a file
-c verify:<filename>:[<addr>]
examples:
verify:firmware.bin         verify that start of memory matches firmware.bin
verify:firmware.bin:0x1000  verify that memory at offset 0x1000 matches firmware.bin
To generate different size sample files use these examples:
dd bs=1K count=64  < /dev/urandom > test64KB.bin
dd bs=1M count=16  < /dev/urandom > test16MB.bin
dd bs=1M count=64  < /dev/urandom > test64MB.bin
dd bs=1M count=128 < /dev/urandom > test128MB.bin
dd bs=1M count=256 < /dev/urandom > test256MB.bin
Using SAM-BA with QML script files
SAM-BA can execute scripts written in QML to do automaticaly complex functions.
With the following QML script for example it is possible to write and verify at91bootloader on the NANDFLASH.
import SAMBA 3.5
import SAMBA.Connection.Serial 3.5
import SAMBA.Device.SAMA5D3 3.5

SerialConnection {
    device: SAMA5D3Xplained {
    }

    onConnectionOpened: {
        // initialize Low-Level applet
        initializeApplet("lowlevel")

        // initialize NAND flash applet
        initializeApplet("nandflash")

        // erase all memory
        applet.erase(0, applet.memorySize)

        // write file
        applet.write(0x000000, "at91bootstrap.bin", true)

        // verify file
        applet.verify(0x00000, "at91bootstrap.bin", true)
    }
}
save it in a file called for example mytest.qml then lauch it by typing:
sudo ./sam-ba -x mytest.qml
EMMC
Write the EMMC with a bootable class='acmetable' Linux image:

Download a microSD image from this link:
Download binary images for Acqua
sudo ./sam-ba -p usb -b sama5d3-xplained -a sdmmc -c write:debian-bullseye-acqua.img.xz
