How to use the ADC lines
Pinout of ADC lines
The Analog to Digital converter lines are located on the following pins:
| Signal | Description                        | Acqua        | Aria       | Arietta      |
|--------|------------------------------------|--------------|------------|--------------|
| 3.3V   | 3.3 volt power line                |              |            | J4.5         |
| AVDD   | Clean 3.24V out for A/D circuitry  |              |            |              |
| VREF   | A/D voltage reference input        | J1.50        | W19 (PA31) |              |
| AGND   | Analog GND                         |              |            |              |
|  AD0   | Analog input 0                     | J1.40 (PD20) | W20 (PB11) | J4.34 (PB11) |
|  AD1   | Analog input 1                     | J1.41 (PD21) | W21 (PB12) | J4.36 (PB12) |
|  AD2   | Analog input 2                     | J1.42 (PD22) | W22 (PB13) | J4.38 (PB13) |
|  AD3   | Analog input 3                     | J1.43 (PD23) | W23 (PB14) | J4.40 (PB14) |
|  AD4   | Analog input 4                     | J1.44 (PD24) |            |              |
|  AD5   | Analog input 5                     | J1.45 (PD25) |            |              |
|  AD6   | Analog input 6                     | J1.46 (PD26) |            |              |
|  AD7   | Analog input 7                     | J1.47 (PD27) |            |              |
|  AD8   | Analog input 8                     | J1.48 (PD28) |            |              |
|  AD9   | Analog input 9                     | J1.49 (PD29) |            |              |
|  AD10  | Analog input 10                    | J2.2  (PD30) |            |              |
|  AD11  | Analog input 11                    | J2.1  (PD31) |            |              |
|  GND   | Digital GND                        | J2.4         |  W1        | J4.9         |
On Arietta and Aria the A/D resolution is 10 bits so using for example a Vfer or 3.3 volt the minimal resolution is about 3.2 mV.
On Arietta the VREF line is wired internally to the 3V3 volt so is not possible to change it.
By wiring the VREF pin to AVDD or VDD (max 3.3 volt) it's possible to read a max voltage of 3.24 volt with a resolution of 10 bit (1024 samples). In this way the max sample resolution we obtain is about 3.24V/1024 ~= 3mV.
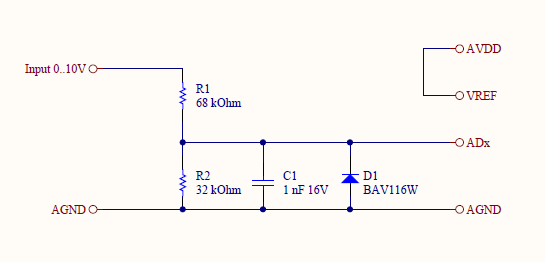
On VREF no voltage higher than 3.3 Volt can be applied. If you need to read a higher signal use a schematic like this:

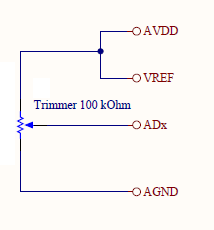
A module called DAISY-20 is available to use these lines in the range of 0 to 10 volts. Elsewhere use this schematic to test quickly the A/D lines:

Enable the Linux Kernel ADC modules
Follow this tutorial: to know how to cross compile the Linux Kernel and how to configure the drivers to enable inside it.
Enable the IIO user space interface and the Microchip/Atmel ADC device driver as shown below:
Device Drivers  --->
    <*> Industrial I/O support  --->
        <*> Enable software IIO device support
        <*> Enable software triggers support
        Analog to digital converters  --->
            <*> Atmel AT91 ADC
            <*> Atmel AT91 SAMA5D2 ADC
Configure the device tree
Edit the device tree source of your board adding these lines:
Acqua
Insert this definition to enable the driver and the pin to use (Acqua pinout):
adc0: adc@f8018000 {
    pinctrl-names = "default";
    pinctrl-0 = <
        &pinctrl_adc0_adtrg
        &pinctrl_adc0_ad0
        &pinctrl_adc0_ad1
        &pinctrl_adc0_ad2
        &pinctrl_adc0_ad3
        &pinctrl_adc0_ad4
        &pinctrl_adc0_ad5
        &pinctrl_adc0_ad6
        &pinctrl_adc0_ad7
        &pinctrl_adc0_ad8
        &pinctrl_adc0_ad9
        &pinctrl_adc0_ad10
        &pinctrl_adc0_ad11
        >;
    status = "okay";
};
Aria
pinctrl@fffff400 {
    adc0 {
        pinctrl_adc0_ad0: adc0_ad0 {
            atmel,pins = <AT91_PIOB 11 AT91_PERIPH_GPIO AT91_PINCTRL_NONE>;
        };
        pinctrl_adc0_ad1: adc0_ad1 {
            atmel,pins = <AT91_PIOB 12 AT91_PERIPH_GPIO AT91_PINCTRL_NONE>;
        };
        pinctrl_adc0_ad2: adc0_ad2 {
            atmel,pins = <AT91_PIOB 13 AT91_PERIPH_GPIO AT91_PINCTRL_NONE>;
        };
        pinctrl_adc0_ad3: adc0_ad3 {
            atmel,pins = <AT91_PIOB 14 AT91_PERIPH_GPIO AT91_PINCTRL_NONE>;
        };
    };
};

adc0: adc@f804c000 {
    status = "okay";
    pinctrl-names = "default";
    pinctrl-0 = <&pinctrl_adc0_ad0 &pinctrl_adc0_ad1 &pinctrl_adc0_ad2 &pinctrl_adc0_ad3>;
    atmel,adc-channels-used = <0xf>;
    atmel,adc-num-channels = <4>;
    compatible = "atmel,at91sam9x5-adc";
    atmel,adc-startup-time = <40>;
    atmel,adc-status-register = <0x1c>;
    atmel,adc-trigger-register = <0x08>;
    atmel,adc-use-external;
    atmel,adc-vref = <3250>;
    atmel,adc-res = <8 10>;
    atmel,adc-res-names = "lowres", "highres";
    atmel,adc-use-res = "highres";
    trigger@0 {
        trigger-name = "continuous";
        trigger-value = <0x6>;
    };
};
Arietta
Use the Arietta G25 pinout to enable the ADC lines
Use the ADC from user space
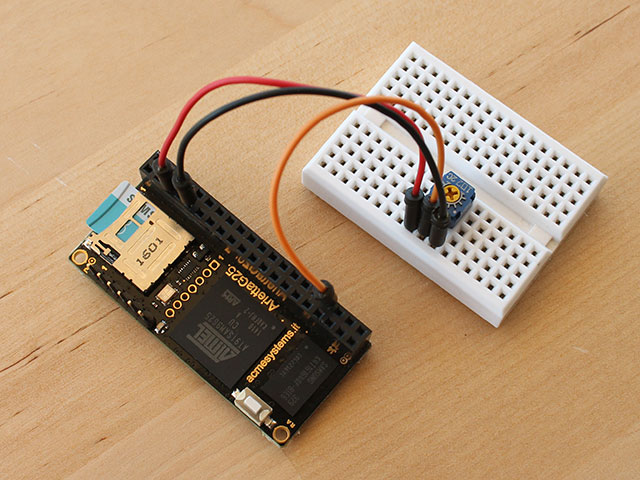
Here is a simple hardware setup to quickly test the A/D lines:

It is a simple linear trimmer (1Kohm but any value is ok) with the central cursor wired to J4.34 (AD0) and the other terminals wired to J4.9 (GND) and J4.5 (3V3).
To read the cursor position in a range o 0 to 1023 type:
root@arietta:~# cat /sys/bus/iio/devices/iio\:device0/in_voltage0_raw
512
Python example
import time

def get_adc_value():
    with open("/sys/bus/iio/devices/iio:device0/in_voltage3_raw") as f:
        value=int(f.read())
        return value

while True:
    print get_adc_value()
    time.sleep(1)
Links
- Use of the AT91 ADC driver by Atmel
- Using the SAMA5D2-compatible ADC device
- How to use the ADC lines

Systems designer, webmaster of www.acmesystems.it and founder of Acme Systems srl
Personal email: tanzilli@acmesystems.it
Web pages: https://www.acmesystems.it --- https://www.acmestudio.it
Github repositories: https://github.com/tanzilli --- https://github.com/acmesystems
Telegram group dedicated to the Acme Systems boards: https://t.me/acmesystemssrl


